Learn Angular with free step by step angular tutorials
All you need to learn about Angular, the best tips and free code examples so you can get the most out of Angular.Angular CRUD with Firebase
Introduction to this Angular CRUD example
In this angular tutorial, we are going to explain how to perform a CRUD in an Angular application using cloud firestore as a database.
We are going to create an angular example website that will have:
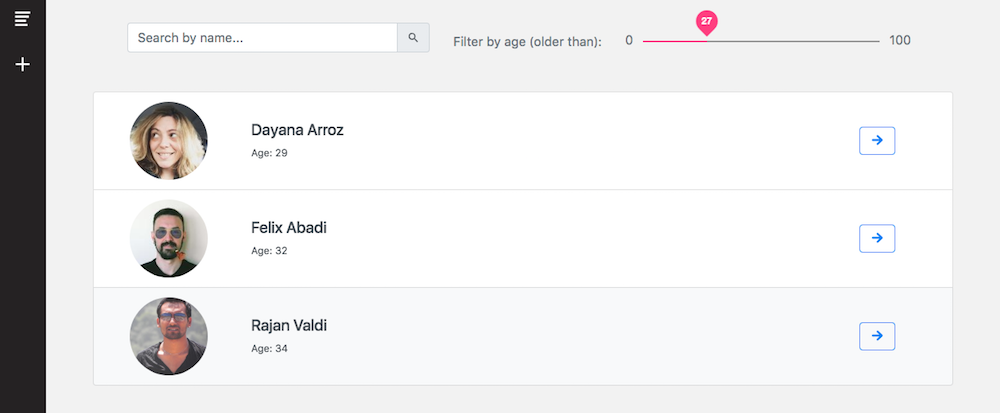
- A list of users which can be filtered by name and by age
- A page to add a new user
- A page to edit the data of a user
- Delete a user
The data of a user will be: Name, Surname, Image, Age.
Below are some images of the CRUD angular app we will be building in this angular tutorial using angular material and Bootstrap 4.
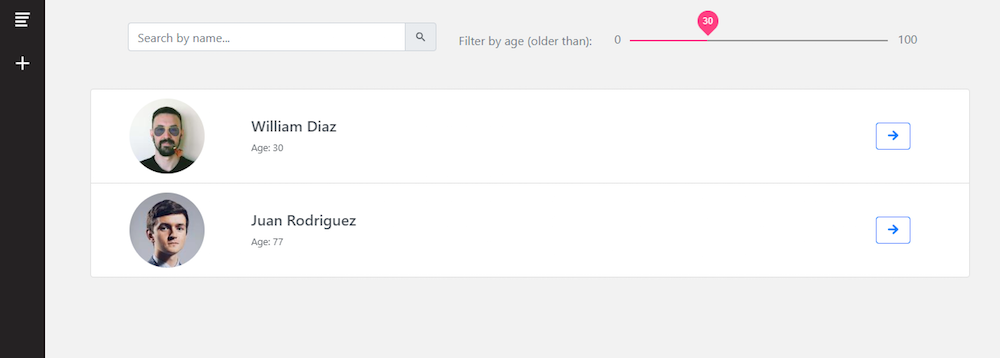
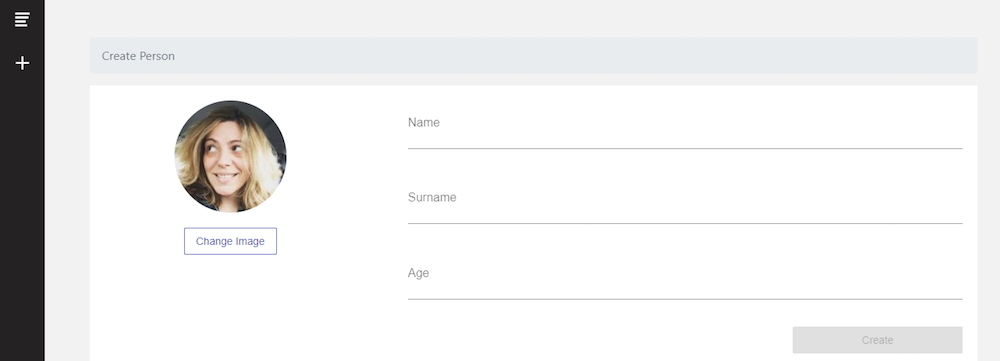
Clicking the GET THE CODE button from above, you’ll be able to download the angular firebase example app that we developed for this angular tutorial. This app has a list of users on which we’ll perform CRUD operations. Also, you will learn how to query collections in Firebase from an Angular app.
What is CRUD?
CRUD stands for Create, Read, Update and Delete operations.
We will go through the step by step of building an Angular CRUD with Firebase. Feel free to reuse this angular crud example as a boilerplate to start building your own Angular website.
If you need to learn more about angular main building blocks as well as the best practices for building a complete app with Angular you should first read Angular Tutorial: Learn Angular from scratch step by step.
Angular has been very actively releasing new versions of their framework. The better understand the differences between angular versions, I recommend you to read Angular for beginners: AngularJS vs Angular 2 vs Angular 12+
Remember you can download all the source code of this angular starter app and also play with the online demo
Reasons to use Angular and Firebase
What is Firebase?
Firebase is a well accepted tool that helps you build apps fast, without managing infrastructure. It’s a powerful Database as a Service (DBaaS) solution that provides a scalable NoSQL cloud database to store and synchronize information for client and server side development. Firebase is built on Google infrastructure and scales automatically, for even the biggest applications, so you don’t have to stress over scaling your very own servers.
Almost every application needs to store data as content is the essence of the communications and interactions with users. In particular you will need to store information to support your business logic, and also you will need some sort of backend to handle user authentication.
Firebase cloud functions are here to help
Firebase provides backend services that will strongly decrease the complexity of handling user authentication with Angular for both mobile and web applications. Firebase authentication and all backend related tasks can be easily implemented in your Angular project using Firebase functions.
I trust Firebase is a good choice for your web or mobile apps developed with Angular because it provides highly useful backend services like real-time database, storage, authentication, etc. Moreover, it is supported by Google and offers a free multi-platform authentication feature.
In this tutorial, we will use Firestore Database. However, Firebase offers two cloud-based, client-accessible database solutions that support real-time data syncing. Learn about the differences between them in the Firebase Documentation.
Is Firebase Free?
Firebase is not open source and it has a freemium model. However, you can use it for free if you don't pass the limits of their free tier. So, in the case you plan to build a big app with lots of users check their pricing page before deciding to go with it. Depending on your app needs, you may be fine with the Free tier.
Support for Firebase in Angular has been growing lately, and in this firebase angular tutorial, we will demonstrate how to create an angular and firebase example app that is able to perform the CRUD operations utilizing Firebase as a database.
At AngularTemplates we strongly believe that learning out how to code is much easier with real code examples. That's why in all our angular tutorials we create and deliver a FREE and fully functional angular example application.
To learn about firebase authentication, read our previous post about Firebase Authentication in Angular.
In this angular CRUD example you will learn the following:
- How to create an angular application and install the required dependencies.
- How to create and configure a Firebase application.
- How to connect the angular app with the Firebase app.
- How to use AngularFire library to perform the CRUD operations from an Angular project.
- How to use Angular Material and Bootstrap 4 in an Angular app.
- How to query Firebase collections from an Angular app.
If you want to build a complex and robust web app with Angular you should check Angular Site Template which is a super complete application to build your next angular project. It includes Bootstrap 4, Angular Universal (Server Side Rendering), SEO, Lazy Loading and a detailed documentation on how to get started building Angular apps. Tons of use cases implemented the Angular way such as authentication flows, product listing, filtering, forms, routing guards and more.
Set up Firebase in your Angular project
1. Create a new Angular project (or use an existing one)
To begin with this angular guide, we’re going to create an application with Angular. You can download this Angular example app for free, by clicking the GET THE CODE button from above, or you can create your own Angular app from scratch.
If you are looking for angular starter apps with beautiful designs and professional code you should check our latest theme: Angular Site Template. It will help you saving time when building your Angular project and will help you learn the Angular best practices.
2. Install AngularFire and Firebase
We are going to use angularfire2 plugin in order to connect our Angular application with the firebase database. Now that you have a new Angular project setup, install AngularFire and Firebase from npm by running the following command:
npm install @angular/fire firebase --save
3. Add Firebase config to environments variable
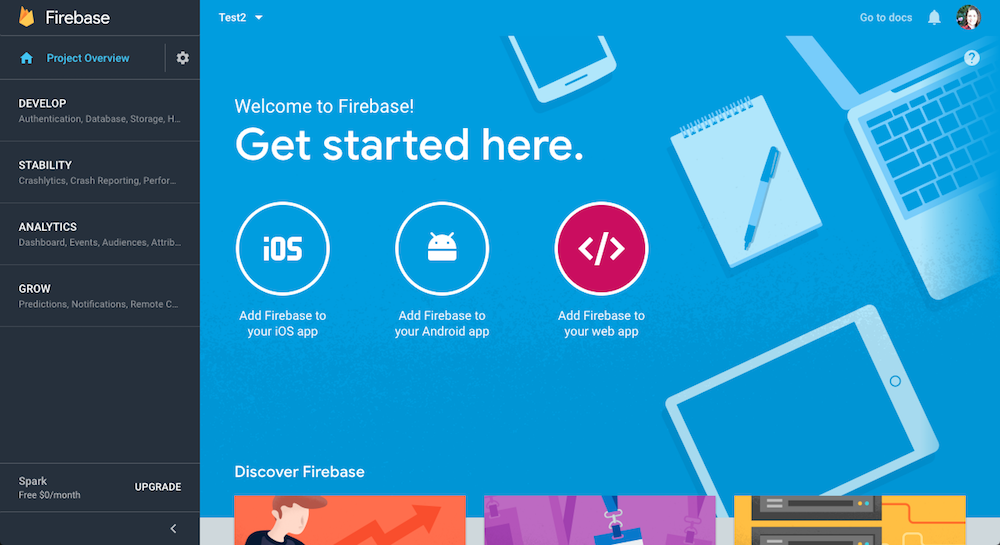
Now we go to firebase console and start a new firebase project. Once it is created we move to configuration section and click on the Add Firebase to your web app button.
A pop up with your firebase app credentials will be shown. The pop up will have the following information about your new Firebase App:
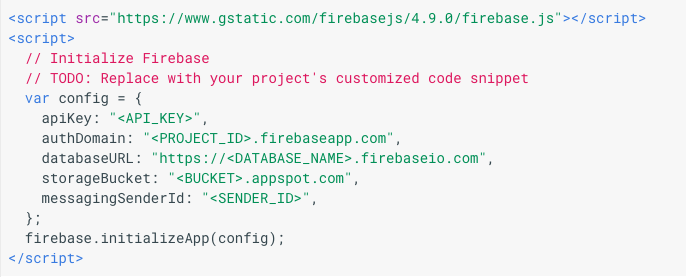
In order to connect our Angular app with our new Firebase app we will copy these credentials in the environment.ts file located in src/environments/environment.ts from our Angular project.
export const environment = {
  production: false,
  firebase: {
    apiKey: YOUR_API_KEY,
    authDomain: YOUR_AUTH_DOMAIN,
    databaseURL: YOUR_DATABASE_URL,
    projectId: YOUR_PROJECT_ID,
    storageBucket: "",
    messagingSenderId: YOUR_MESSAGING_SENDER_ID
  }
};
4. Setup the Modules for Firebase
Open your AppModule located in /src/app/app.module.ts and inject the Firebase providers for Firestore and specify your Firebase configuration.
import { AngularFireModule } from '@angular/fire';
import { AngularFirestoreModule } from '@angular/fire/firestore';
import { environment } from '../environments/environment';
And then on the imports section add:
imports: [
 	AngularFireModule.initializeApp(environment.firebase),
 	AngularFirestoreModule,
	...
[
At this point we finished the configuration and we are ready to start developing the functionalities of this Angular crud example app.
Angular Firebase CRUD Tutorial
Our CRUD will be about Users, and they will have the following attributes:
- name
- surname
- age
- avatar
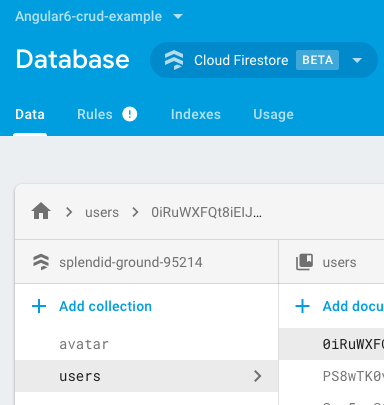
In our Firebase Console we will have two collections:
- Users.
- Avatars: to store the available profile pictures.
As we mentioned before, Cloud Firestore is a NoSQL, document-oriented database so, there are no tables or rows. Instead, you store data in documents, which are organized into collections. Each document contains a set of key-value pairs. Cloud Firestore is optimized for storing large collections of small documents.
If you want to build a complex and robust web app with Angular you should check Angular Admin Template which is the most complete and advanced Angular Admin Template with lots of components and performance improvements. It includes features such as Angular Universal, AOT (ahead of time compilation), Material Design, Lazy Loading Routes and lots of beautiful and useful components.
Project Structure
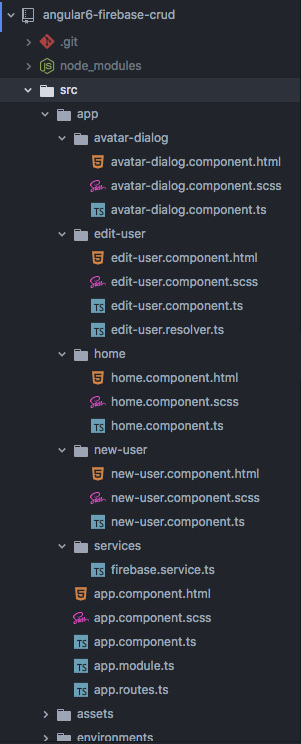
The following screenshot is the Angular project code structure of this Angular example app.
Firebase Service
We created an Angular Service to interact with the FireStore database. This service is named FirebaseService and you can find it in the example code under src/app/services/firebase.service.ts
This service is going to use an AngularFirestore instance (public db: AngularFirestore) and will include all the code to perform all the CRUD operations in angular.
CRUD Operations in Angular
Create Operation
The first functionality we will address in this firebase CRUD tutorial is the CREATE. First of all, it’s necessary to have basic knowledge about Angular Forms to manage the user information.
For the profile avatar we have some pictures already loaded in the firebase database which will be used as an avatar. We will use a dialog from Angular Material to display all the avatar available for selection. We also added an attribute “nameToSearch” that will be explained below.
Let’s focus on adding a new User to our database. As mentioned before, the code to add the new user to Firebase database will be in our FirebaseService. So, we will need to create an angular form so the user can enter the data of the new record to be created. We are going to use Angular Reactive Forms and Angular Material input styling. We also added some basic forms validations to validate that the fields are not empty.
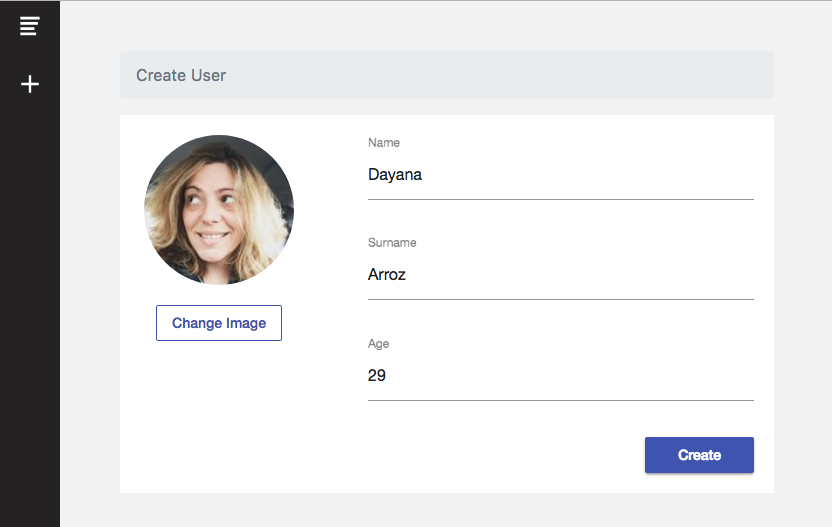
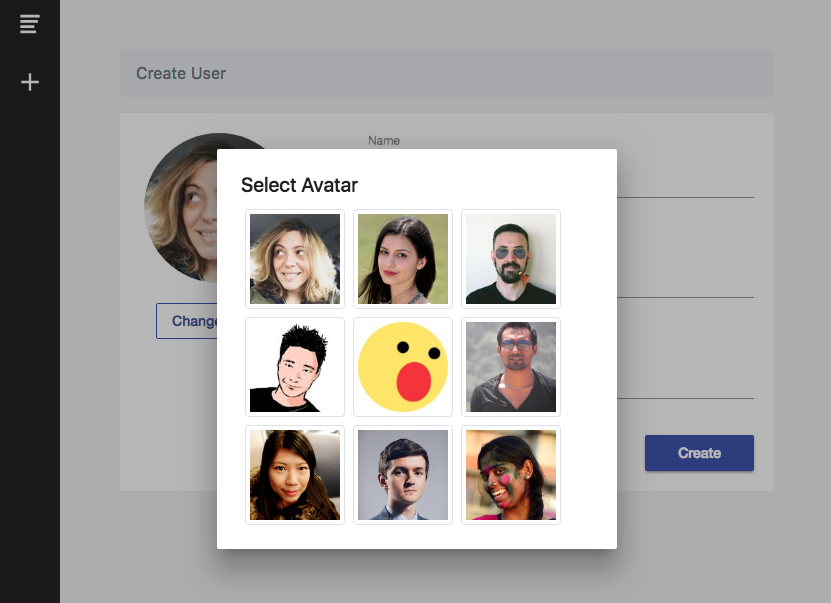
When the User submits the form the new record will be added to our users collection in FireStore. Let’s see the code.
The html of our Create form is in src/app/new-user/new-user.component.html:
<form class="create-form" [formGroup]="exampleForm" novalidate (ngSubmit)="onSubmit(exampleForm.value)">

  <div class="form-group">
    <mat-form-field class="input-style">
      <input matInput placeholder="Name" class="form-control" formControlName="name">
    </mat-form-field>
    <ng-container *ngFor="let validation of validation_messages.name">
      <mat-error *ngIf="exampleForm.get('name').hasError(validation.type) && (exampleForm.get('name').dirty || exampleForm.get('name').touched)">{{validation}}</mat-error>
    </ng-container>
  </div>

  <div class="form-group">
    <mat-form-field class="input-style">
      <input matInput placeholder="Surname" class="form-control" formControlName="surname">
    </mat-form-field>
    <ng-container *ngFor="let validation of validation_messages.surname">
      <mat-error *ngIf="exampleForm.get('surname').hasError(validation.type) && (exampleForm.get('surname').dirty || exampleForm.get('surname').touched)">{{validation}}</mat-error>
    </ng-container>
  </div>

  <div class="form-group">
    <mat-form-field class="input-style">
      <input matInput type="number" min="0" max="100" placeholder="Age" class="form-control" formControlName="age">
    </mat-form-field>
    <ng-container *ngFor="let validation of validation_messages.age">
      <mat-error *ngIf="exampleForm.get('age').hasError(validation.type) && (exampleForm.get('age').dirty || exampleForm.get('age').touched)">{{validation}}</mat-error>
    </ng-container>
  </div>

  <div class="row submit-button-container">
    <div class="col-md-4">
      <button mat-raised-button class="submit-button" color="primary" type="submit" [disabled]="!exampleForm.valid">Create</button>
    </div>
  </div>

</form>
Our NewUserComponent in src/app/new-user/new-user.component.ts:
onSubmit(value){
	this.firebaseService.createUser(value, this.avatarLink)
	.then(
	  res => {
	    this.resetFields();
	    this.router.navigate(['/home']);
	  }
	)
}
Our FirebaseService in src/app/services/firebase.service.ts
createUser(value, avatar){
  return this.db.collection('users').add({
    name: value.name,
    nameToSearch: value.name.toLowerCase(),
    surname: value.surname,
    age: parseInt(value.age),
    avatar: avatar
  });
}
Note: “nameToSearch” value is the name of the User but in lower case. This will be useful when we make the searching by name functionality.
Read Operation (Users feed)
Before starting with this CRUD operation it is important to clarify that the "users" collection must be created in Firebase Console. This can be done in two ways:
- Creating the collection with a test document from the firebase console.
- Adding a User as we did in the previous section, which will automatically generate the collection with the new document (user).
Once we create some Users, we can list them and show their attributes. We are going to use ngOnInit function to get the data from firebase database when the Home page is visited.
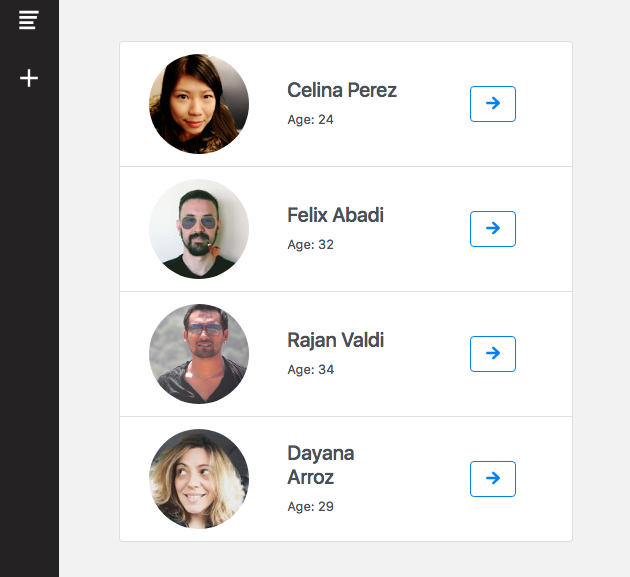
In our HomeComponent
export class HomeComponent implements OnInit {

  items: Array<any>;

  constructor(
    public firebaseService: FirebaseService,
    private router: Router
  ) { }


 ngOnInit() {
   this.firebaseService.getUsers()
    .subscribe(result => {
      this.items = result;
    })
  }
Note: this.items is an array that contains all people collection.
On our firebase service:
getUsers(){
  return new Promise<any>((resolve, reject) => {
    this.afs.collection('/people').snapshotChanges()
    .subscribe(snapshots => {
      resolve(snapshots)
    })
  })
}
Note that we use the snapshotChanges() method to get the data of our Users collection. This function returns an Observable of data as a DocumentChangeAction. We use snapshotChanges() and not valueChanges() because we will need to have the Users IDs available to then perform the Update and Delete operations.
The html code required to list our Users will be the following:
<div class="list-group users-list">
	<div *ngFor="let item of items" class="list-group-item list-group-item-action flex-column align-items-start">
		<div class="row">
			<div class="col col-md-2 image-col">
				<img class="image" [src]="item.payload.doc.data().avatar">
			</div>
			<div class="col col-md-8 text-col">
				<h5 class="mb-1>{{item.payload.doc.data().name}} {{item.payload.doc.data().surname}}</h5>
				<small>Age: {{item.payload.doc.data().age}}</small>
			</div>
			<div class="col col-md-2 actions-col">
				<button class="btn btn-outline-primary action" (click)="viewDetails(item)" type="button">
					<ion-icon class="icon" name="arrow-round-forward"></ion-icon>
				</button>
			</div>
		</div>
	</div>
</div>
Visit this link to learn more about working with Collections in Firebase and Angular using AngularFire.
Update Operation
It’s time for the Update operation of our CRUD Angular example app.
Here we also need to make use of Angular Forms. Also, we need to know the key (or user id) of the person we are going to update. As we explained in the Read Users section, we use the snapshotChanges() function so we can get the User ID along with his stored data.
Analogical to the Create a User step, when we click on the Save button, we will submit the data and send it to our FirebaseService so it can be processed and sent to Firestore.
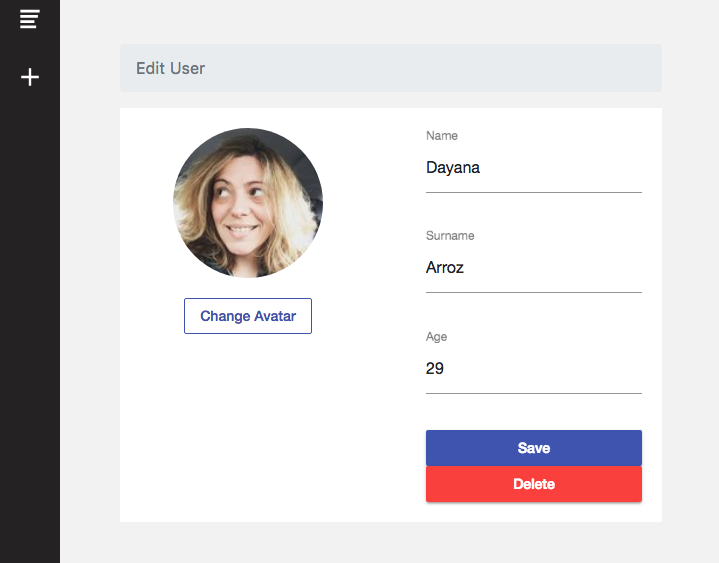
onSubmit(value){
  value.avatar = this.item.avatar;
  value.age = Number(value.age);
  this.firebaseService.updateUser(this.item.id, value)
  .then(
    res => {
      this.router.navigate(['/home']);
    }
  )
}
On Service:
updateUser(userKey, value){
  value.nameToSearch = value.name.toLowerCase();
  return this.db.collection('users').doc(userKey).set(value);
}
Delete Operation
The last operation of the CRUD is the Delete operation. Every document of Firestore cloud database (Users in our example) have their own key (or ID), so to delete any document we only need to know his key.
In our Angular Firebase CRUD example app, the DELETE button is located inside the User Details page. So you can find the code in the EditUserComponent located in: src/app/edit-user/edit-user.component.ts
delete(){
  this.firebaseService.deleteUser(this.item.id)
  .then(
    res => {
      this.router.navigate(['/home']);
    },
    err => {
      console.log(err);
    }
  )
}
Note: this.item is the User selected to be deleted.
The code in our FirebaseService is as simple as this:
deleteUser(userKey){
  return this.db.collection('users').doc(userKey).delete();
}
So, that was all for the CRUD operations with AngularFire. Hope you didn’t have any problem or issue. Remember you can download all the source code of this example angular app and run it on your computer.
Filtering Data in Firebase
In this section, we are going to explain how to query collections using Firestore. For this Angular Firebase example we created the following filters:
- Filter users by age
- Filter users by name
Query Users by Age
Let’s start with the Age filter. In this example we are going to filter Users older than a selected Age.
The code for this function is in the HomeComponent. We will have an ageValue number variable and a list age_filtered_items where the filtered results will be loaded.
To implement the Range filter UI we used a Material Slider component.
<mat-slider
  class="age-slider"
  max="100"
  min="0"
  step="1"
  thumbLabel="true"
  (ngModel)="ageValue"
  (change)="rangeChange($event)">
</mat-slider>
In our HomeComponent
rangeChange(event){
  this.firebaseService.searchUsersByAge(event.value)
  .subscribe(result =>{
    this.age_filtered_items = result;
    this.items = this.combineLists(result, this.name_filtered_items);
  })
}
In our FirebaseService:
searchUsersByAge(value){
  return this.db.collection('users',ref >
	ref.orderBy('age').startAt(value)).snapshotChanges();
 }
Note: We use orderBy to select the data of the collection to filter, and startAt to especificate the range to start. Learn more about Querying Collections in AngularFirestore.
Query Users by Name
Filtering by name is similar to filtering by age implementation, so in our FirebaseService we have the following code:
searchUsers(searchValue){
  return this.db.collection('users',ref => ref.where('nameToSearch', '>=', searchValue)
    .where('nameToSearch', '<=', searchValue + '\uf8ff'))
    .snapshotChanges()
}
Note: The \uf8ff character used is a very high code point in the Unicode range. Because it is after most regular characters in Unicode, the query matches all values that start with searchValue.
As we said before, “nameToSearch” is in lowercase, so when we execute the search function we have to lowercase that value too. This is because Firebase is not key sensitive, so for example searching for “Rob” and “rob” will throw different results. In this implementation we convert all search values to lowercase and solve the problem.
searchByName(){
  let value = this.searchValue.toLowerCase();
  this.firebaseService.searchUsers(value)
  .subscribe(result => {
    this.name_filtered_items = result;
    this.items = this.combineLists(result, this.age_filtered_items);
  })
}
Final thoughts
In this tutorial we learned how to perform all the CRUD operations in an Angular web page based on firebase data. To build this Angular and Firebase Guide we used angular material, bootstrap 4 and angularfire libraries. We also used the amazing and new Angular CLI 6 which makes our life as angular developers much easier.
We learned how to configure a firebase application and how to use angularfire2 to communicate between the angular website and cloud firestore database.
We also learned two very important filtering operations, such as:
- filter people by name
- filter people by age
I believe Firebase is a powerful tool that can help us saving time when developing web or mobile applications with Angular. It provides highly useful backend services such as storage, real-time database, authentication, etc. Now that you learned how to perform all the CRUD operations you can continue with this Firebase Authentication Tutorial.
If you are in the process of starting your Angular project and need help, take a look to our Angular Templates which will help you with Bootstrap 4, Angular Universal (Server Side Rendering), SEO, Lazy Loading and so much more!
Angular Site Template is our latest Angular template and includes tons of use cases implemented the Angular way such as authentication flows, product listing, filtering, forms, routing guards and more.
Check our
YouTube Channel

TOPICS
TABLE OF CONTENTS
-
Introduction
-
Reasons to use Angular and Firebase
-
Set up Firebase
-
Angular Firebase CRUD Tutorial
-
Project structure
-
CRUD operations
-
Filtering data
-
Final thoughts
Comments
Our aim is to help developers of different skill levels get the most out of Angular by saving their expensive time and providing great resources for them to learn faster and better.
