Learn Angular with free step by step angular tutorials
All you need to learn about Angular, the best tips and free code examples so you can get the most out of Angular.Firebase Authentication with Angular
User Handling with Angular
When developing web applications, any type of authentication feature is necessary.
If you think of the many social platforms and email sign in options available, authentication looks like a very complex task, so developing from scratch an integral login system makes the developer feel a little puzzled by the amount of work to be done.
Every app needs to store data as content is the essence of the communications and interactions with users. In particular you will need to store data to support your business logic and you will need some sort of backend to handle user authentication.
Firebase provides backend services that will drastically decrease the complexity of handling user authentication with Angular for both mobile and web applications. With Firebase, authentication and all backend related tasks can be easily implemented in your Angular project.
Firebase User Authentication
Fortunately, there are services that give us great advantages such as saving us the heavy work it takes to develop all the user authentication flow. Among these systems are Firebase and Auth0.
Firebase provides a very simple way to setup authentication in your apps. It is very easy to integrate with your application and can be configured to be used with several social authentication providers such as Facebook, Google, Github, Twitter, etc. By integrating these authentication providers, users can use their existing social accounts to perform the login on your web or mobile application. It also allows users to register with email and password or phone number accounts.
I believe Firebase is ideal for your web or mobile applications developed with Angular, because it provides highly useful backend services such as storage, real-time database, authentication, etc. In addition, it is backed by Google and offers a free multi-platform authentication feature.
It is worth mentioning that the Firebase Database is a non-SQL database which works with JSON objects (without tables or records), where it can store and synchronize the data among its users in real-time.
In this post we will explore how to setup a simple email/password as well as social login authentication workflows for Angular apps using the awesome AngularFire2 library. AngularFire is the official library for Firebase and Angular.
If you need to go deeper about angular main building blocks as well as the best practices for building a complete app with Angular you should first read Angular Tutorial: Learn Angular from scratch step by step.
Authentication Tutorial Step by Step
In the next section you will learn how to develop a web application in Angular that is able to handle social and custom authentication. We will integrate Facebook, Google and Twitter authentications and also an email and password option. Remember you can get all the source code by clicking in the above GET THE CODE button.
You will also learn step by step how to develop an Angular authentication system using Firebase as an authentication platform.
Then, if you can to continue learning angular and firebase, I suggest you to read Angular CRUD with Firebase to learn how to create an Angular Application with the CRUD operations using Firebase Firestore Database.
We know that building beautifully designed Angular apps from scratch can be frustrating and very time-consuming. That's why we created Angular Site Template to help you save hundreds of hours of development and design time.
With Bootstrap 4, Angular Universal (Server Side Rendering), SEO, Lazy Loading and a detailed documentation on how to get started building Angular apps. Tons of use cases implemented the Angular way such as authentication flows, product listing, filtering, forms, routing guards and more.
Setting up Firebase in your Angular project
To continue learning with this tutorial it is necessary that you do the following:
- Create and properly configure your development environment to be able to develop Angular web apps
- The Nodejs & npm (Node package manager)
- The Angular CLI command line interface, which allows you to create the angular project and facilitates the generation of components.
- Create an Angular project where we will integrate this functionality or you can also download the code of this Angular tutorial and connect it to your Firebase account.
After setting up your dev environment, you are going to create a free Firebase account. To do this, visit the page https://firebase.google.com/ and Log in to your account (or create a new one). Then press the Go to the console link. On the console you will have the option to create a new Firebase project, do it.
Once you have created the firebase project you will be redirected to the following screen:
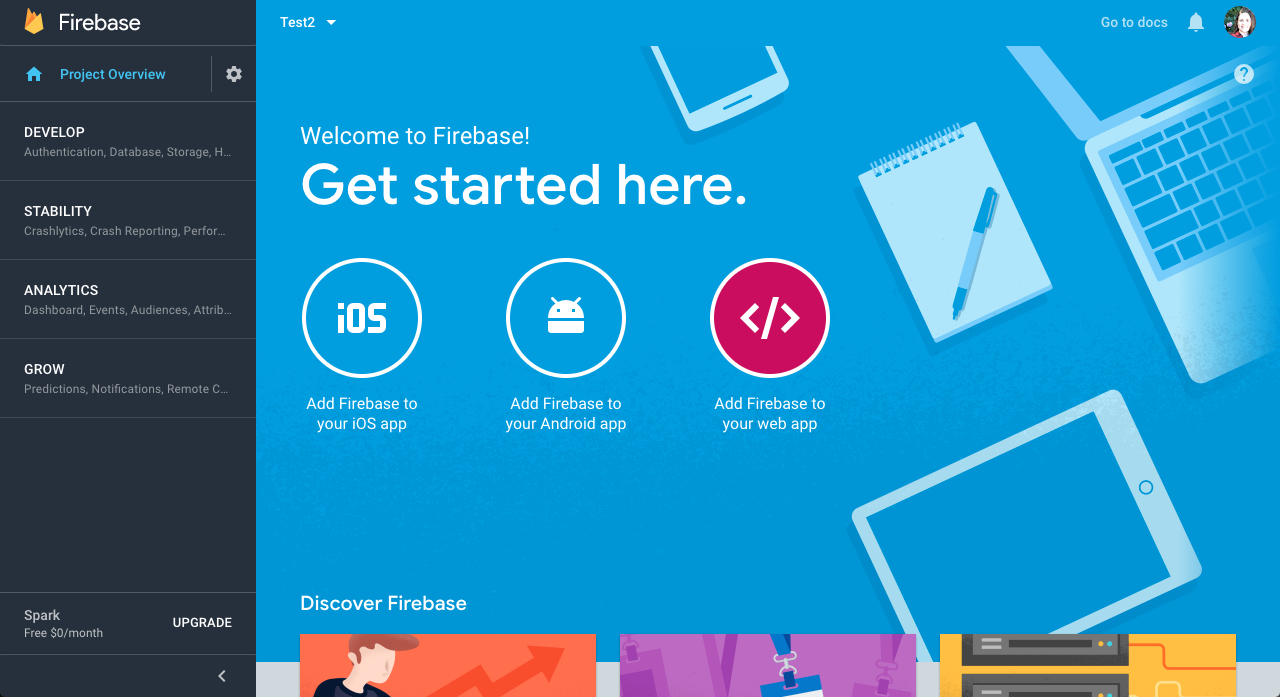
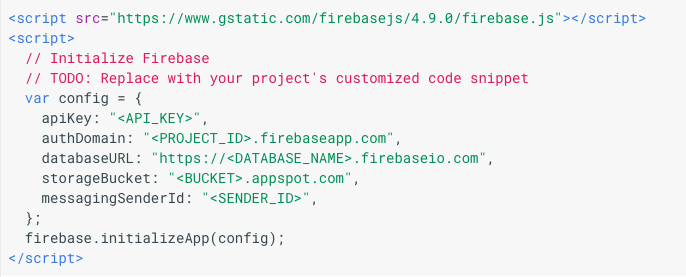
Click on the Add Firebase to your web app button and a pop up with your app credentials will be shown. The pop up will have the following information about your new Firebase App:
Connect Firebase to your Angular project
The next thing we need to do to connect Firebase to our Angular project is to add the Firebase app credentials from above in our Angular project. We will add this credentials in our Angular project configuration file environment.ts located in src/environments/environment.ts
export const environment = {
  firebase: {
    apiKey: "YOUR_API_KEY",
    authDomain: "YOUR_AUTH_DOMAIN",
    databaseURL: "YOUR_DATABASE_URL",
    projectId: "YOUR_PROJECT_ID",
    storageBucket: "YOUR_STORAGE_BUCKET",
    messagingSenderId: "YOUR_SENDER_ID"
  }
};
Installing AngularFire2
To connect the Angular web application to the Firebase database we will use the Angular Fire library, which is no more than the official firebase library for Angular. We have to install it on our Angular project in order to use all the Firebase authentication features it provides.
In order to install the plugin we should run the following command in our Angular project:
npm install @angular/fire firebase --save
Then we must import the Firebase libraries into our app.module.ts so we can use them in our Angular project. To do this go to src/app/app.module.ts and add the following imports.
import { AngularFireModule } from '@angular/fire';
import { AngularFirestoreModule } from '@angular/fire/firestore';
import { AngularFireAuthModule } from '@angular/fire/auth';
import { environment } from '../environments/environment';
We have also to declare them on the Module imports section like this:
imports: [
  AngularFireModule.initializeApp(environment.firebase),
  AngularFirestoreModule, // imports firebase/firestore, only needed for database features
  AngularFireAuthModule, // imports firebase/auth, only needed for auth features
  ...
]
Setting up Firebase Social Login Providers
On this step we are going to integrate to our Angular app the social login providers of our choice. In this tutorial we will enable Google, Facebook and Twitter as social sign-in options for our Angular example app.
To select the authentication methods you want to integrate on your Angular app, go to your Firebase project, under your Firebase console, then go to Develop => Authentication and then click the Sign-in method tab. For better instructions see the image below.
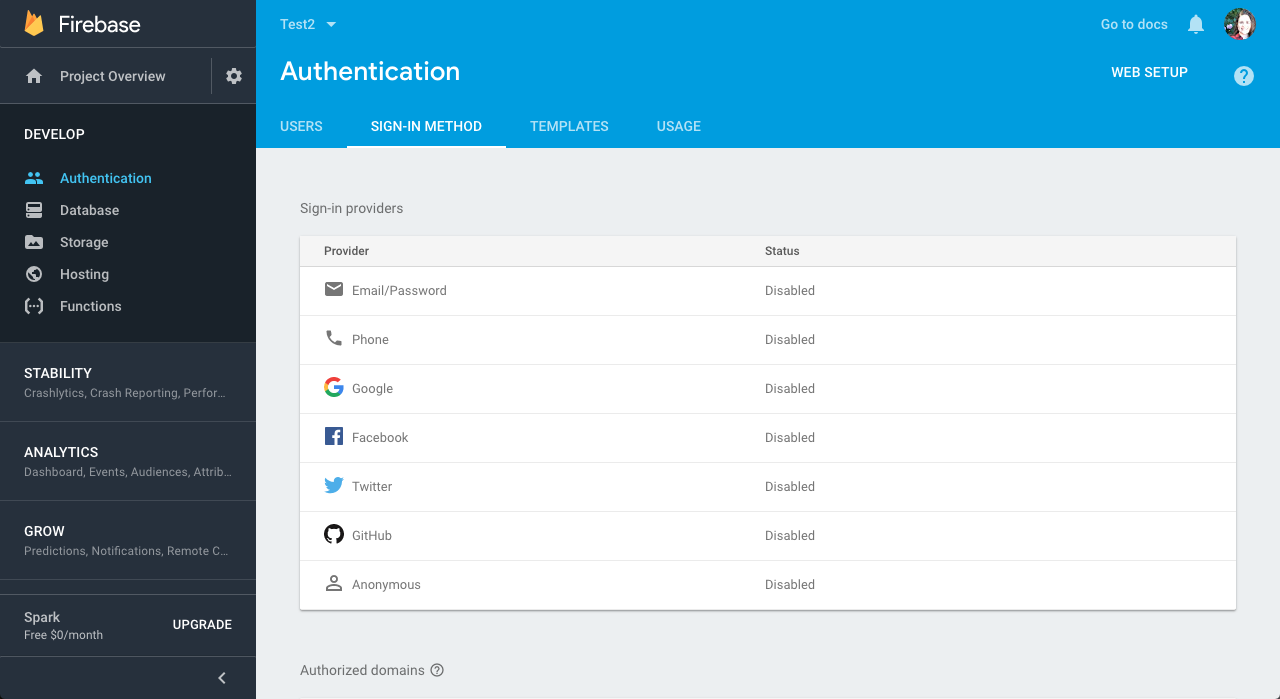
For each provider you want to enable, you have to follow some configuration and setup steps. Don’t worry, we will guide you through this process.
Firebase authentication providers such as Facebook and Twitter, require you to provide a Client API ID and a Client API Secret Key and also use the provided UAuth URI as the redirect URI from your Facebook or Twitter App.
This information is obtained by creating an application for each provider using the developer account of each provider (Facebook and Twitter). Let’s go through each configurations.
Facebook authentication setup
To perform Facebook authentication in your Angular application, you must create a Facebook application in the Facebook developer page. Just follow the steps to create a new app.
Once your Facebook App is created you will get an App Id and App Secret Key. Keep them at hand because you will need them later.
After creating the Facebook application, we go back to the authentication section located in the Firebase console. Then we go to the sign-in methods on the console and enable the Facebook option, for this it is necessary to add the facebook App ID and the App secret key as shown in the screenshot below:
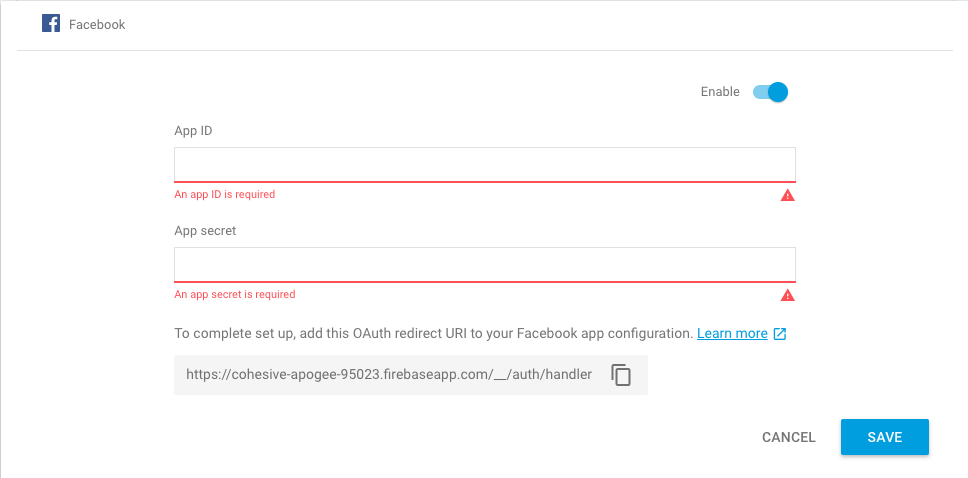
Once Facebook is enabled as a login, a valid OAuth redirect URI will be automatically generated, and must be entered in the Facebook Application panel as shown below:
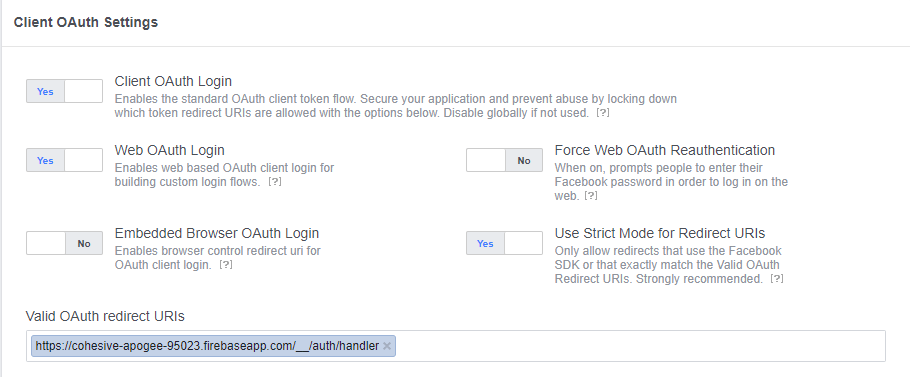
Google authentication setup
To perform the Google social login authentication in your Angular application, we go to the authentication section located in the Firebase console and then to the login method, and we enable the Google option as a login method without need to add any keys.
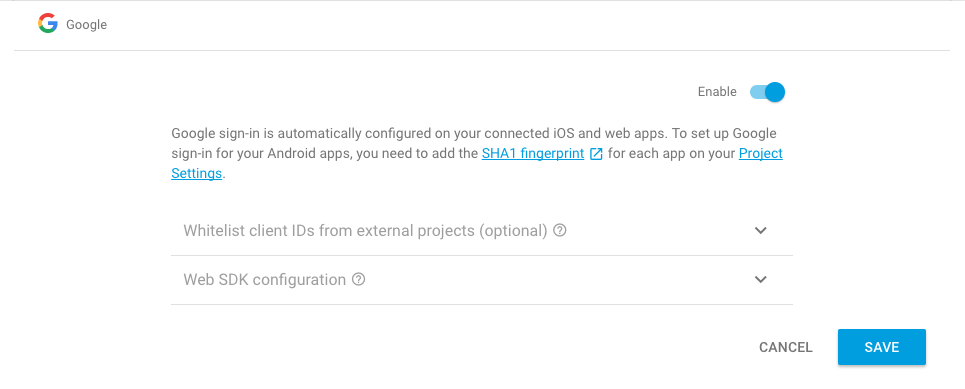
Then we have to follow the SHA1 configuration instructions from the screenshot above.
Twitter authentication setup
Twitter configuration is similar to Facebook configuration. To perform Twitter social login in your Angular application, you need to create a Twitter application in the Twitter application management console. Just follow the steps to create a new app.
Once your Twitter App is created you will get an ID and Secret Key. Keep them at hand because you will need them later.
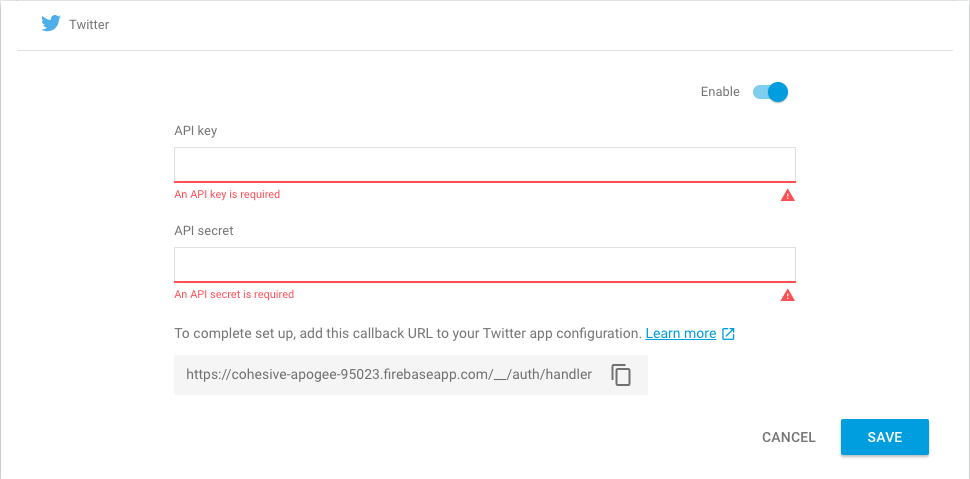
After creating the Twitter application, we go back to the authentication section located in the Firebase console. Then we go to the sign-in methods on the console and enable the Twitter option, for this it is necessary to add the Twitter API KEY and the API SECRET.
Once enabled, a callback URL must be automatically generated which must be added in the Twitter application.
Components, templates and routes
Our Angular example app for this tutorial, will have three components. Each component has its corresponding template.
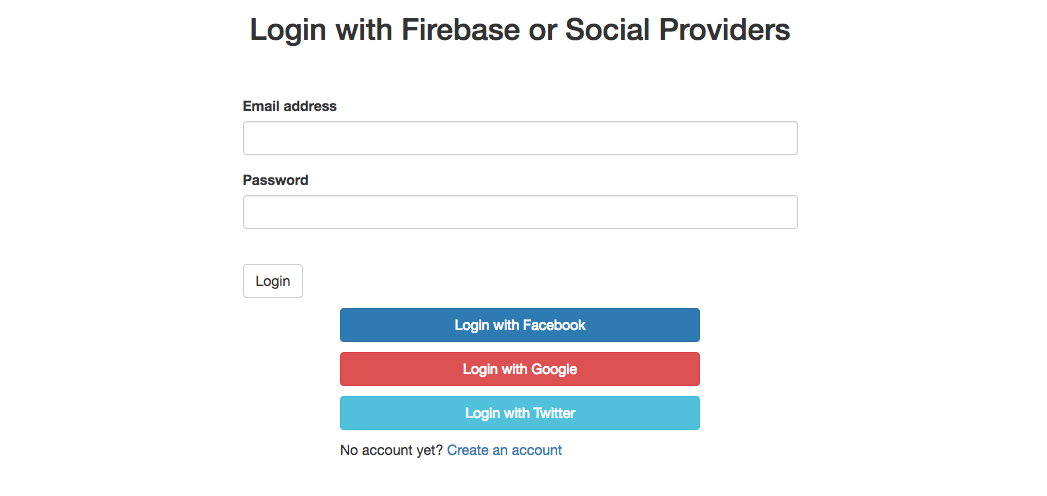
- LoginComponent - This will feature our social logins and will also provide the possibility to login with email and password.
- RegisterComponent - This will feature our social logins and will also provide the possibility to create a new account with email and password.
- UserComponent - This will serve as the protected area that authenticated users will have access to.
The navigation routes are very simple. However, note that we have an AuthGuard which checks if there is a current logged user, and in that case it redirects that user to the User page. The same happens when you try to go to the User page but you are not logged in, you get redirected to the login page, because you don’t have access to the user page.
export const rootRouterConfig: Routes = [
  { path: '', redirectTo: 'login', pathMatch: 'full' },
  { path: 'login', component: LoginComponent, canActivate: [AuthGuard] },
  { path: 'register', component: RegisterComponent, canActivate: [AuthGuard] },
  { path: 'user', component: UserComponent,  resolve: { data: UserResolver}}
];
Authentication Service
In this Firebase Authentication with Angular tutorial, we created an AuthService which is the one that will allow us to login, register and logout users with the different Firebase providers. All the authentication logic will be stored in this service, which will allow us to create components that don’t need to implement any auth logic and will help keep our components simple.
In other words, our AuthService will do most of the heavy lifting and is the glue between our Angular app and Firebase.
So in this service we will import the following classes that we need in order to create our authentication methods:
import { AngularFireAuth } from 'angular/fire/auth';
import * as firebase from 'firebase/app';
Then we add the following to our AuthService constructor:
constructor(public afAuth: AngularFireAuth){}
Social Login
In our AuthService we have the functions to perform each social login using Firebase. For example to do Facebook login we use the following code (you can find it in src/app/core/auth.service.ts).
doFacebookLogin(){
   return new Promise<any>((resolve, reject) => {
     let provider = new firebase.auth.FacebookAuthProvider();
     this.afAuth.auth
     .signInWithPopup(provider)
     .then(res => {
       resolve(res);
     }, err => {
       console.log(err);
       reject(err);
     })
   })
}
If you need to get additional information from the user such as his birthday you can use the addScope method. For example: provider.addScope('user_birthday');
For Google login, we specify additional OAuth 2.0 scopes that we want to request from the Google authentication provider such as profile and email.
doGoogleLogin(){
  return new Promise<any>((resolve, reject) => {
    let provider = new firebase.auth.GoogleAuthProvider();
    provider.addScope('profile');
    provider.addScope('email');
    this.afAuth.auth
    .signInWithPopup(provider)
    .then(res => {
      resolve(res);
    })
  })
}
Email/Password Login
In the same way we did with social providers, we have to enable email/password sign-in method in the Firebase console.
For this functionality it's necessary to have some basic knowledge about Angular Forms because we need to create a form so the user can input his email and password and then submit it. In this angular example app we are going to use Reactive Forms, so in our register page template we have the following html code:
<form [formGroup]="registerForm">
   <div class="form-group">
     <label>Email address</label>
     <input type="email" formControlName="email" class="form-control" required>
   </div>
   <div class="form-group">
     <label>Password</label>
     <input type="password" class="form-control" formControlName="password" required>
     <label class="error">{{errorMessage}}</label>
     <label class="success">{{successMessage}}</label>
   </div>
   <button type="submit" (click)="tryRegister(registerForm.value)" class="btn btn-default">Register</button>
</form>
Then in our register.component.ts we have our tryRegister() function which calls the AuthService and then shows the success or error message.
tryRegister(value){
  this.authService.doRegister(value)
  .then(res => {
    console.log(res);
    this.errorMessage = "";
    this.successMessage = "Your account has been created";
  }, err => {
    console.log(err);
    this.errorMessage = err.message;
    this.successMessage = "";
  })
}
In AuthService our doRegister() function simply calls Firebase authentication method createUserWithEmailAndPassword() using the data provided by the user. Firebase performs some validations to these data such as checking if the password is at least 6 chars, or if the email is already associated to another account. If everything is OK, then Firebase will resolve the promise returning the new User information.
doRegister(value){
   return new Promise<any>((resolve, reject) => {
     firebase.auth().createUserWithEmailAndPassword(value.email, value.password)
     .then(res => {
       resolve(res);
     }, err => reject(err))
   })
 }
The login with email and password method is very similar to the register so we won’t repeat it again.
Once the user authenticates himself, using any of the provided authentication options, he will be redirected to the User route and he will see some basic info on the screen such as his name and picture. Clicking the Logout button, will make the AuthState to null and redirect the user to the login screen.
Final Thoughts
Hopefully, you didn't run into any issues with this Firebase authentication with Angular tutorial, but if you did, feel free to post in the comments section below. Remember you can get the full source code of this Angular app by clicking the GET THE CODE button from the beginning of this page.
Now you can go ahead and learn how to create an Angular Application with the CRUD operations using Firebase.
That’s it for basic authentication with Firebase. Now you can start saving custom user information to Firestore to build a complex and robust user authentication system.
If you want to build a complex and robust web app with Angular you should check Angular Admin Template which is the most complete and advanced Angular Admin Template with lots of components and performance improvements. It includes features such as Angular Universal, AOT (ahead of time compilation), Material Design, Lazy Loading Routes and lots of beautiful and useful angular components.
Check our
YouTube Channel

TOPICS
TABLE OF CONTENTS
-
Introduction
-
Setting up Firebase
-
Setting up Social Login Providers
-
Components, templates and routes
-
Authentication Service
-
Social Login
-
Email/password Login
-
Final Thoughts
Comments
Our aim is to help developers of different skill levels get the most out of Angular by saving their expensive time and providing great resources for them to learn faster and better.
