Learn Angular with free step by step angular tutorials
All you need to learn about Angular, the best tips and free code examples so you can get the most out of Angular.Learn how to build a MEAN stack application with this Angular tutorial
Angular MEAN stack tutorial: Connecting a backend API to an Angular frontend application tutorial
The goal of this tutorial is to guide you through the coding of a full-stack JavaScript example application project and connecting a backend API to an Angular front-end application employing the MEAN stack.
By the end of this Angular advanced tutorial, you will learn about the mean stack from scratch, including how to build a RESTful API with Loopback and using it to perform CRUD operations on a MongoDB database through an Angular frontend. Just in case you didn’t know it, CRUD stands for Create Read Update and Delete.
The focus of our content is Angular, but in order to develop more powerful full stack Angular apps, it's necessary to integrate the Angular front-end with a real back-end. The MEAN stack is one of the most common stacks that accompany Angular as a frontend framework.
MEAN stands for MongoDB, ExpressJS, Angular and NodeJS. It is a concept that came a few years ago with the spreading popularity of these modern web app technologies, and the so popular single page applications.
With the upgraded Angular, the MEAN Stack gets more powerful than ever. With the sublime performance of NodeJS as the Back-end, Angular as the Front-end and MongoDB as Database we have a powerful combination to work with.
I will also introduce you to LoopBack, which is an open-source NodeJS framework that will greatly simplify the building process of REST APIs with NodeJS in combination of ExpressJs.
This will be the main base for your web application project and will allow you to build any kind of application that you wish. As always, you are able to start from absolute scratch and go step by step as you improve and learn all the basics.
We already covered in depth how to build a complete app with Angular in our previous tutorial. In this second part we will be focusing on the angular backend integration by building a mean stack example application based on the Angular app we built in the first part.
If you want to learn how to build a production-ready angular app, I suggest you to take a look at our premium starter apps which will help you learning all the core concepts of an angular application.
Learn MEAN stack from scratch
Why MEAN Stack?
These recent years have been a change from classic web applications to a Back-end and Front-end segregation in modern single page applications. This makes it easier for servers to communicate, not only with web browsers (like connecting an API to an Angular front-end application), but also with a variety of mobile devices, without needing to change one single line of code.
In this tutorial we are going to present you the most popular approach: MEAN, a JavaScript stack for building modern web applications and websites.
Let's review the MEAN different parts:
- MongoDB acts as the database for your application, in case you need to persist data. It's where records are stored. MongoDB is a document-oriented NoSQL database, that stores data in a JSON-like format and allows the user to perform SQL-like queries against it.
- ExpressJS is a web framework for NodeJS, commonly used as a backend for web apps in this stack. In our case we are going to use Loopback (instead of just ExpressJS), which extends and builds on top of Express to ease the creation of RESTful APIs.
- Angular is the client side web framework.
- NodeJS powers express and will be the layer where our server will run.
The most important fact is that you only needed to know one language, Javascript, to get started with the MEAN stack. Full stack javascript development enables your team to master one technology and be able to build full stack (frontend and backend) applications with ease.
Angular backend framework: Loopback vs Express
Which framework should I use, ExpressJS or LoopBack?
LoopBack is a highly-scalable open source framework to easily create APIs while being easy to learn and understand at the same time. Node and Express are the foundations where LoopBack is built in.
So, rather than a replacement, Loopback adds simplicity to the mix, enabling you to write less code, when compared to other frameworks.
Why bothering creating an API from the ground up when you can use a scaffold template to speed the development?
As a summary, here’s a great comparison between them:
Plain Express Cons
- All endpoints need to be created manually, you end up re-typing a lot of the same code
- Refactoring becomes painful because everything needs to be updated
- Doesn’t come with “standard” configurations, you will have to figure out your own approach
Loopback Pros
- Very quick RESTful API development
- Convention over configuration
- Built-in models ready to use
- Fully configurable when needed
- Have their own "adapters" that can be used to connect to different databases (MongoDB/Oracle/MySQL/SQL Server), each of them with its own ORM.
- Extensive documentation
- Full time, top notch team working on the project. Loopback is developed by Strongloop (company), one of the top NodeJS contributors.
- Available commercial support
- Mature, enterprise-ready framework
With Loopback you can quickly create a REST-based API based on a model, where this model represents the content you are working with. It also provides a very good code structure and you can browse your API using an integrated built-in Explorer (we will see this in a few minutes).
Angular backend integration: The Loopback Angular SDK
An ace under the sleeve. LoopBack plays really nice with Angular!
Loopback has a pretty handy tool, the Loopback Angular SDK. This SDK fits pleasantly in the workflow of a frontend web developer. Running just one command will auto-generate Angular services that will provide client-side representations of the models and remote methods in the LoopBack server app. You don’t have to write any static code.
Pst… there are also SDKs for Android and iOS ;)
We must thank Jonathan Casarrubias for building the @mean-expert/loopback-sdk-builder which is a community driven module forked from the official loopback-sdk-angular and refactored to support Angular 2+. The LoopBack SDK Builder will explore your LoopBack Application and will automagically build everything you need to start writing your Angular apps right away.
Best backend and database for Angular?
Are there other alternatives?
We have already compared Loopback with its “brother” ExpressJS, but there are other alternatives you may consider.
In particular I’m talking about Firebase. Though, you can’t compare them directly as one helps you build a REST API and the other one is more like a Backend As A Service. If you use Firebase, you would basically be replacing the MongoDB part of the MEAN stack with it instead.
Although you can use Firebase directly from your Angular app, if you do so, you would be disposing all the benefits from the REST API part of the equation and ending up with a monolith app in which the user interface and data access code are combined (NOT GOOD).
Having said that, you could use Firebase the right way by using the available connectors between loopback and firebase, so eventually you can get the most out of both of them.
Firebase would serve as your data source as opposed to MongoDB.
If you choose to go the Firebase way, you may find useful to save this post about Firebase Authentication with Angular for future reading.
Restful API’s: Node with Angular FTW
And the winner is …
NodeJS is a perfect solution to quickly build projects and that’s why it is widely applied by startups, mid-sized companies and even large enterprises like PayPal, Walmart, eBay, LinkedIn, Uber and other industry giants. On the other side, LoopBack allows developers to focus on solution architecture, business strategy and user experience by making APIs easier to generate, design and connect to databases.
Each project is different and requires an unique approach regarding to the technical requirements and clients’ expectations. You will have to consider flexibility, further maintainability, cost and available features. While performance and functionality are important, requirements, goals and business logic of a particular project are important as well.
Considering the above-mentioned advantages, LoopBack might seems to be an obvious choice for your next project.
If you are in the process of starting your Angular project and need help, take a look to our Angular Templates which will help you saving hundreds of design and development hours.
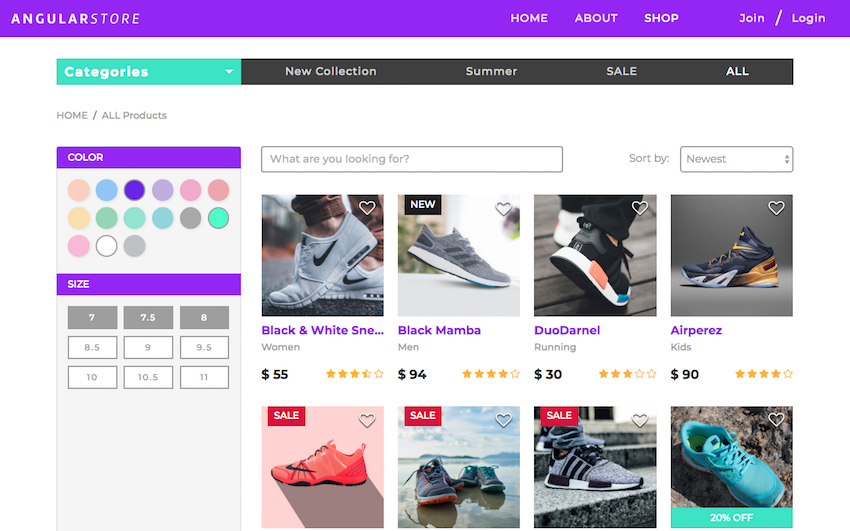
Angular Site Template is our latest Angular template and includes tons of use cases implemented the Angular way such as authentication flows, product listing, filtering, forms, routing guards, SEO, Angular Universal (Server Side Rendering), Bootstrap 4, Lazy Loading and more.
Angular RESTful APIs
What does RESTful API really mean?
The whole point is to add a backend integration to our Angular frontend app. But not just any kind of backend, REST API’s have some benefits compared to traditional ways.
REST (REpresentational State Transfer). It is an architectural style that allows client-server communication through an interface. It is also stateless, cache-able and has a property called idempotence, which means that multiple identical requests have the same cumulated side effects as a single request would.
On the other hand, the API part of “REST API” stands for application program interface, and is the code that allows two software programs to communicate with each other. With the cloud use growth, APIs are emerging to expose web services. REST is a logical choice to build APIs that allow users to connect and interact with cloud services.
Single page application backend: Stateful vs Stateless
Most of us who have been working in this field for a while are familiarized to programming within a container server which provides the “session” concept which maintains its state across multiple HTTP requests.
Back to the definition of REST, statelessness is crucial. What this means is that the state to handle the request is contained within the request itself, in other words, the client must include all information for the server to fulfill the request.
Statelessness enables higher scalability since the server does not have to store any state about the client session. Also, load balancers don't have to care about session affinity for stateless systems which means that every server can serve any client at any time.
That is what ST in REST means, State Transfer. You transfer the state instead of having the server store it. This is the only way to handle millions of concurrent users.
Building a modern full stack Javascript example app project
Let’s get started
Through the course of this tutorial, we will link additional concepts and information. You can use these links as supplementary material which can help you gain insight into the stack and its components.
This tutorial assumes that you have programming knowledge and at least basic knowledge of JavaScript. Before you begin, you will also need to have Node.js installed. Node empowers client development and build tools. We are going to use the node package manager (npm) to install all the JavaScript libraries dependencies. Get these right now if they are not installed on your computer.
Note: Verify that you are running at least node 6.9.x and npm 3.x.x by running node -v and npm -v in a terminal/console window. Older versions may produce errors, but newer versions are always recommended.
I will recommend you to download a good Text Editor or IDE. I personally prefer Atom, but Visual Studio Code and Sublime Text are great too.
Setting up the MongoDB database
You have two options for setting MongoDB. You can either use a DaaS (Database as a Service) like mlab.com, or you can setup your own MongoDB locally.
Don’t worry, we will explore both options. In this tutorial we are going to use a local installation of MongoDB and in the next tutorial about deploying our solution, we are going to setup a mLab account to host our MongoDB remotely.
To set up MongoDB locally, you need to visit the MongoDB Downloads page and choose the installation package based on your OS. Once you have it installed, you need to check the MongoDB Installation documentation which will show you the necessary steps for getting MongoDB running on your machine.
For example, on Mac, you have to start MongoDB at the terminal by running:
mongod
Then, to interact with MongoDB directly, you have to open another terminal and run:
mongo
Mongo shell will allow you to run queries, create databases, insert records, etc from the terminal. Check the documentation to learn more.
Setting up the front-end: Angular & the Angular CLI
If you followed the first part of this tutorial series, then you have already done this. If you haven’t so, I recommend you to read it before we continue. Having said that, I will go through the basics really quick.
Angular apps are created and developed primarily through the Angular CLI (command line interface tool) that helps project creation, adding files and performing a variety of ongoing development tasks.
The Angular CLI takes care of configuration and initialization of various libraries. It also helps us adding components, directives, services, etc, to already existing Angular applications. It’s also worth mentioning that the CLI uses Typescript and Webpack for module bundling, it includes everything you need to start writing your Angular application right away.
To install the Angular CLI globally, run the following command on your console:
npm install -g @angular/cli
Note: You may need to add “sudo” in front of these commands to install the utilities globally
Important note: If you have an older version of the CLI installed in your computer, make sure you properly update it to the latest Angular CLI. Check the instructions.
Now, let’s continue building the Angular app example project
As I mentioned before, we started this Angular app in part 1 of this tutorial. We are not going to go through the creation of the Angular app, instead we are gonna resume where we left in our first tutorial.
In order to resume working on our app, let’s start by cloning from github the project we started in the first tutorial:
git clone https://github.com/AngularTemplates/learn-angular-from-scratch-step-by-step
cd learn-angular-from-scratch-step-by-step
Once we are located in the project folder, we can proceed to install the dependencies by running this command:
npm install
Finally, to get a quick preview of your app inside the browser, use the serve command.
ng serve
The serve command runs the compiler in watch mode (looks for changes in the code and recompiles if needed), starts the server, launches the app in a browser and keeps the app running while we continue building it.
If you followed the procedure above, after serving the app, you can see that the Webpack Development server listens on HTTP port 4200. If you open the url http://localhost:4200/ you will see the app running.
Setting up the backend: Strongloop
Let’s start installing the Loopback command-line interface (CLI) tool by running this command:
npm install -g loopback-cli
Note: This will install the lb command-line tool for scaffolding and modifying LoopBack applications. For more information, see the LoopBack Command Line Tool documentation.
Before starting the backend project, we need to have MongoDB running. Open a terminal and run:
mongod
With the database running, we can start creating a RESTful server with LoopBack.
We are going to use the LoopBack CLI tool to create and build our application. You can then extend and modify the code as desired according to your specific needs.
Here you can either choose to create your new Loopback project or to download the code of this tutorial.
If you want to create a new project follow these steps:
Run the following command to create a new project:
lb
After you run this command, you will be asked some details about the project (name of the app, name of the folder, etc).

It’s time to start the server by running:
node .
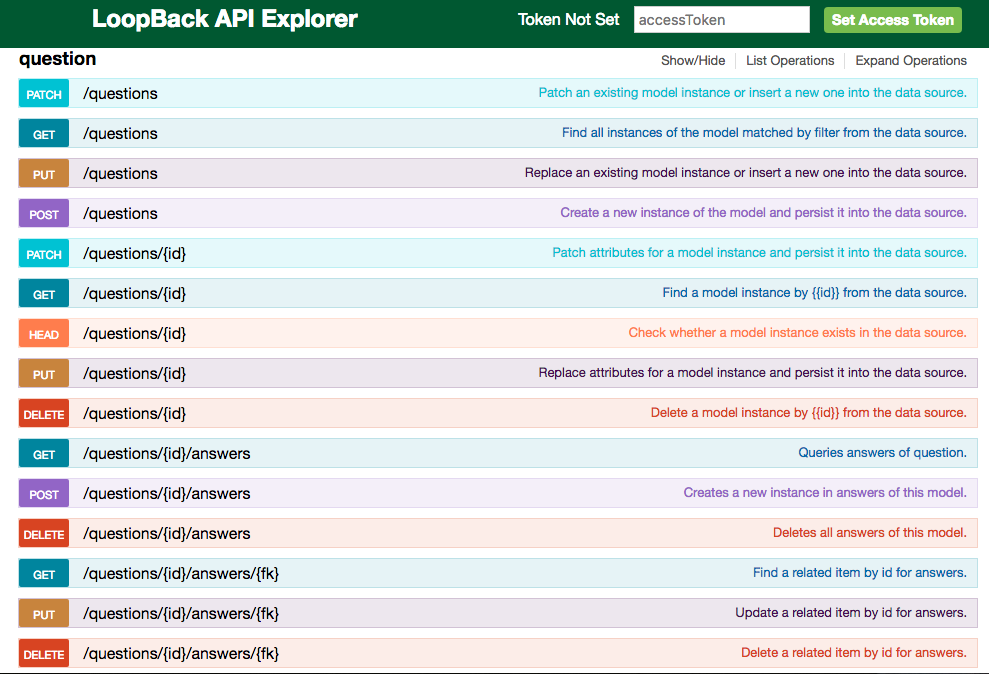
LoopBack created a user model for the API and all the basic routes needed. If you open a browser and access http://localhost:3000/explorer, you will see this:
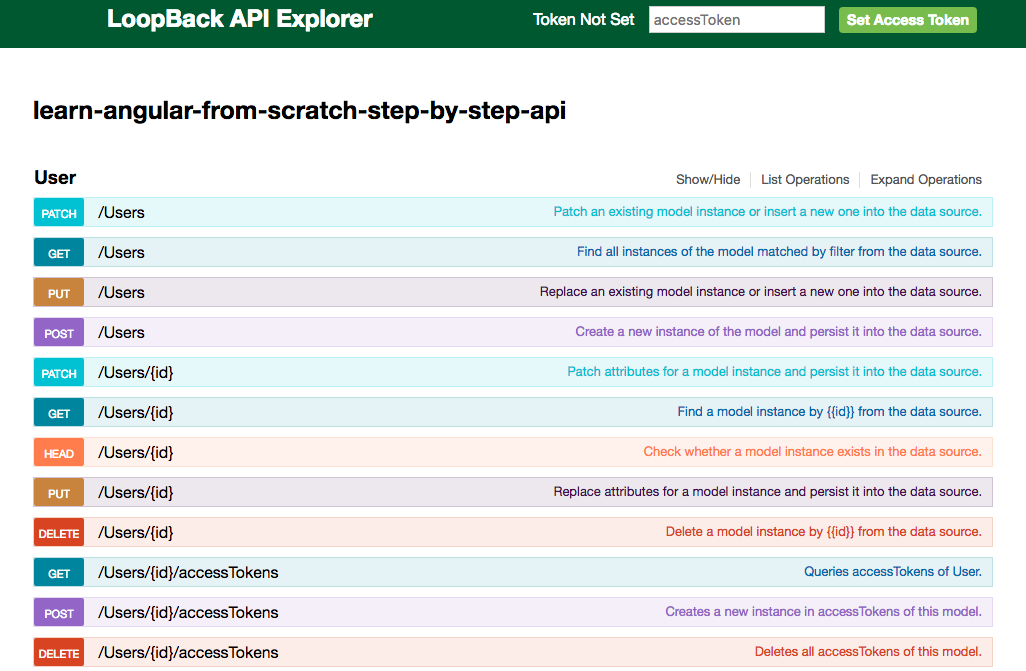
The API explorer is a great tool to visualize and try out our generated API. If you add new models in the LoopBack project, the corresponding routes will be created automatically.
If you want to use the code of this tutorial follow these steps:
- Download the code of this tutorial and open it on your console
- Run npm install to install the project dependencies
And that’s it. Now it’s time to start the server by running:
node .
LoopBack created a built-in User model and our custom Answer and Question models and all the basic routes needed. If you open a browser and access http://localhost:3000/explorer, you will see this:
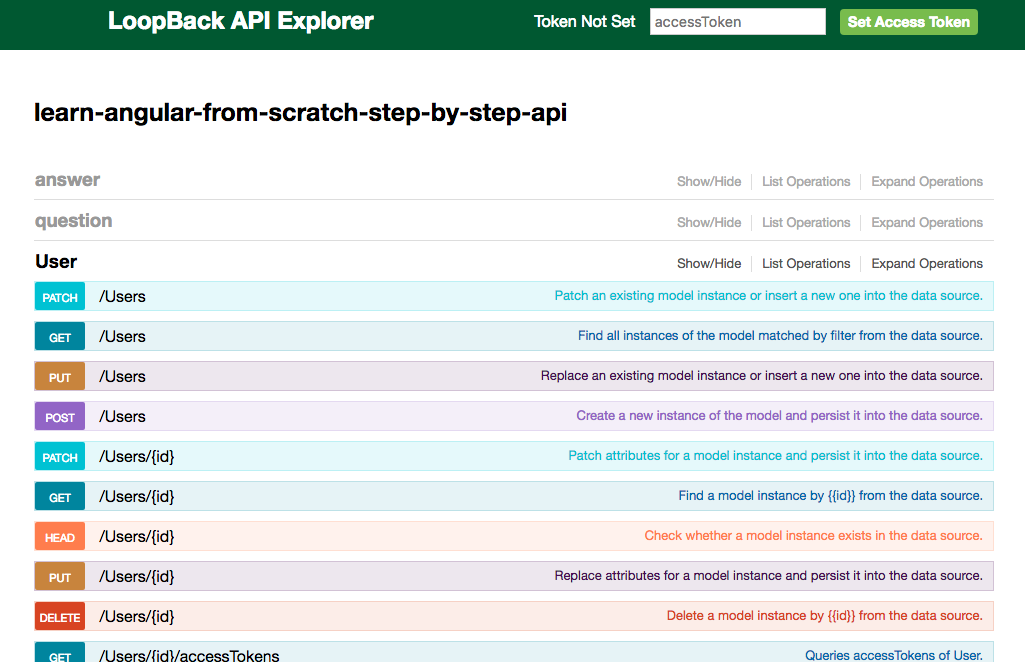
Take a few seconds to explore all the routes that loopback created for us.
Angular CRUD Web Application Example
Project specifications
We are going to have two projects: one for the frontend (with Angular) and the other for the backend integration (with MongoDB, and Loopback which includes NodeJS and ExpressJS). We have already talked about the benefits of having the two separate projects, so I’m not going to repeat myself, but it’s a good thing, trust me.
In the first tutorial we went through the steps of creating an Angular application with TypeScript. It was a very good introduction and now we are building and improving upon that.
For this second part tutorial, we are going to connect an API to that Angular front-end app.
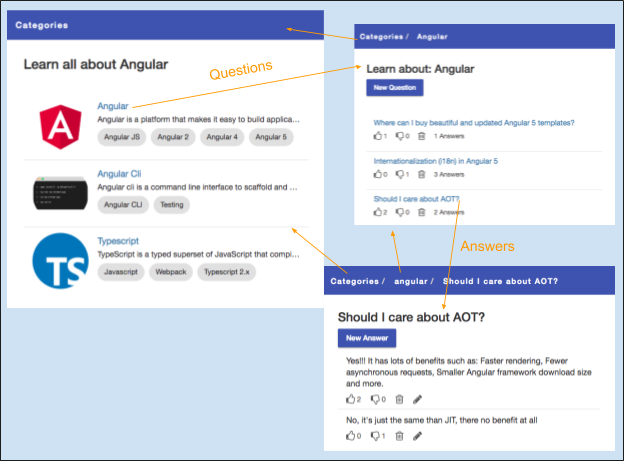
In our example project, with a questions and answers format (Q&A), the users will be able to make questions about the different technologies (Angular, Loopback, etc) key concepts and answer those from others. It will have a listing of each technology key concepts and, within the details page, a questions list with the corresponding answers, vote them (up-vote, down-vote) and a form to create new questions.
The plan for this full stack javascript tutorial is to build an app that takes you step-by-step from setup to a full-featured example that serves to demonstrate the essential characteristics of a professional single page, modern application: a sensible project structure, navigation and remote data access through a RESTful API.
We’ll learn enough core Angular and Node (Loopback) to get started and gain the confidence that with the MEAN stack we can do whatever we need to do. We'll be covering a lot of ground at an introductory level but we’ll find plenty of references to topics with greater depth.
The app consists in a CRUD example (Create, Read, Update, Delete) of Questions and Answers where people can post new questions and answer other people's questions. The App will have the following functionalities:
- Manage Questions (Create, Update, Delete)
- Manage Answers (Create, Update, Delete)
- List all the Questions in a feed format
- List all the Answers of a particular Question
- Enable people to vote Questions and Answers (up-votes and down-votes)
This is how the final App will look like:
In the first part we focused on the frontend and you learned how to:
- Initialize your application using the Angular CLI
- Create classes to represent objects from the model
- Create services to create, update and remove objects
- Create pages and components to represent the functionalities and display the user interface
In this second part, we are going to focus on the backend and how to integrate it with the frontend. You will learn how to:
- Perform CRUD operations with a REST API
- Data modeling and API creation (with Loopback)
Building the Angular REST API backend with NodeJs
As we start building our Angular backend REST API, let’s dive on LoopBack details.
The LoopBack framework can be explained as set of node js modules that can be used independently or together to build REST APIs very quickly.
A LoopBack application interacts with data sources through the LoopBack model API, available locally within Node.js, remotely over REST and native via the client SDKs for iOS, Android, and Angular. Using these APIs, apps can query databases, store data, create push notifications, register users, send emails, upload files, and perform other actions provided by data sources and services.
REST API implementation: Loopback key Modules
Let me explain you a bit more about LoopBack key modules:
-
Models Module
- It handles the Model and API server by dynamically mocking-up models and exposing them as APIs.
-
Initialization Module
- It handles the initialization by configuring application settings, data sources, models and attaching them to data sources.
-
Abstraction Module
- It handles the Model data abstraction. It enables the connection to multiple data sources or services and getting back an abstracted model with CRUD capabilities independent of the data source.
-
Data Module
- Enable connections to RDBMS (Relational database management system) and noSQL data sources and gets back an abstracted model.
-
Components Module
- Includes add-ons to core LoopBack by integrating with pre-built services like push notifications.
-
Clients Module
- Enables developing client apps using native platforms (iOS, Android, Angular) that interact with LoopBack APIs via REST.
REST API implementation: LoopBack core concepts
Let’s review some of the core concepts first to understand how LoopBack works.
Loopback API Models
A powerful aspect of LoopBack is that when you define a new model, it automatically comes with a predefined REST API with a full set of create, read, update, and delete operations. Models have methods for adding hooks and for validating data so you can adapt LoopBack to your project needs.
Every LoopBack application has a set of predefined built-in models such as User, Role, and Application, so you don’t have to create these common models. For example you can use the User built-in model to handle your web authentication.
API Custom Models
You can also define your own custom models specific to your application. You can make your custom models using extend built-in models to build the predefined functionality of User, Application, and other built-in models.
The simplest way to create a new model is using the Loopback CLI and running this command:
lb model <model-name>
When you create a model (for example, called “questions”), the LoopBack command line tool does the following:
- Creates /common/models/questions.json, the model definition JSON file that defines your model in LoopBack.
- Creates /common/models/questions.js, where you can extend the model programmatically. For examples on how to add remote methods see the Adding application logic for more information.
- Adds an entry to /server/model-config.json for the model, specifying the model’s data source see the model-config.json for more information.
You can create and customize models using the LoopBack API, or by manually editing the model definition JSON file. If you want more information about customizing models, you can read customizing models and attaching modelsto data sources.
API Model relations
LoopBack also enables you to easily express relationships between models, such as BelongsTo, HasMany, and HasAndBelongsToMany. We will use some of them in our example app.
REST API Model operations
When you connect a model to a persistent data source such as a database, it becomes a connected model with a full set of CRUD operations. You can see the operations available use the Loopback API explorer, as explained before.
Please see PersistedModel API documentation for more information.
Adding application logic to your REST API
You can add custom application logic in multiple ways. For example:
- Add application logic to models through remote methods (custom REST endpoints), remote hooks that are triggered by remote methods and operation hooks that are triggered by model create, retrieve, update, and delete methods.
- Add boot scripts that run when the application starts.
- Define custom middleware, similar to Express middleware.
Also, you can add code to validate data before saving it to the model and back-end data store.
Backend API Plug-ins
LoopBack provides additional “plug-in” functionalities such as:
- OAuth 2.0 - enables LoopBack applications to function as oAuth 2.0 providers to authenticate and authorize client applications and users to access protected API endpoints.
- Push notifications - enables sending information to mobile apps for immediate display in a ”badge,” alert, or pop-up message on the mobile device.
- Storage component - enables uploading and downloading files to and from a cloud storage provider as well as the server file system.
- Third-party login - integrates Passport and enables user login using third-party credentials from social providers or any system that supports OAuth, OAuth 2, or OpenID.
- Synchronization - enables mobile applications to operate offline and synchronize data with the server when re-connected.
We have gone through all the main concepts of LoopBack. Now it should be easier for you to grasp the procedure of building our backend. If you still feel you need more information, please refer to the oficial LoopBack documentation.
Creating the Node.js backend API
MEAN stack Project structure and beyond
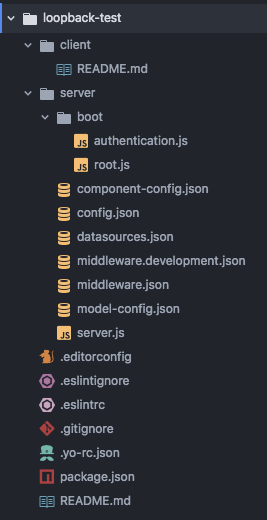
When we create a fresh LoopBack project, this is the folder structure of our backend MEAN project:
-
/client
- This is the place for your application front-end files. However, we are not going to use it because we have our own independent Angular frontend, remember?
-
/server
-
server.js
- This file has the code to start our web server.
-
server.js
-
common/
- All your models (js and json files) will be here.
Now, let’s begin adapting this boilerplate rest api example project to our needs.
We will begin by connecting Loopback with MongoDB by adding a data source, then we will proceed to add the models for our example project.
Note: Remember to add the data source before creating models. That way when creating new models the LoopBack command line tool will suggest you to connect your newly created models with the data source you previously created. Anyways, in case you missed this note and didn’t proceed in that order, there are ways to connect your existing model to a new data source.
MEAN stack: Connecting Loopback with MongoDB
LoopBack models connect to backend systems such as databases using data sources that provide create, retrieve, update, and delete (CRUD) functions. Data sources know how to communicate with the different databases as they are handled by connectors that implement the data exchange logic using database drivers. That’s a good thing about LoopBack as it abstracts the code to connect and communicate with the different databases and instead enable us to interact with the data source that provides a common interface.
LoopBack provides connectors for most popular relational and NoSQL databases. When you attach a model to a data source backed by one of the database connectors, the model automatically acquires the create, retrieve, update, and delete methods.
API backend: Adding a datasource
To add a data source, we are going to use the LoopBack CLI and running this command:
lb datasource
The tool will prompt you for the name of the new data source and the connector to use; for example, MongoDB, MySQL, Oracle, and so on. It will also prompt you to install the dependency for the connector you chose if you haven’t done so already. In our case we will use MongoDB so the connector is: loopback-connector-mongodb
The tool will then add an entry such as the following to the datasources.json file.
"mongo1": {
	"name": "mongo1",
	"connector": "mongodb"
}
After adding the data source you will need to edit that entry with the particular configuration of your database:
"mongo1": {
"host": "localhost",
	"port": 27017,
	"url": "",
	"database": "MEAN_Q_A",
	"password": "",
	"name": "mongo1",
	"user": "",
	"connector": "mongodb"
}
Creating the Loopback backend REST API Models
A LoopBack model is a javascript object that represents data in databases. Models are connected to databases via data sources. You will use the model APIs to interact with the data source to which it is attached. Additionally, you can add functionality such as validation rules and business logic to these models.
After we hook up our backend project with the database (MongoDB), it is time to create the models. Using the LoopBack command line tool, run the following command:
lb model <model-name>
As we mentioned before, the CLI will ask you for the model’s name and the data source you want to connect it.
After creating the model, you will need to add properties to it. You can do so using the LoopBack command line tool when you create the model, or you can defer this and then edit the common/models/<model-name>.json file manually. See the example below:
{
  "name": "question",
  "base": "PersistedModel",
  "idInjection": true,
  "options": {
    "validateUpsert": true
  },
  "properties": {
    "categorySlug":{
      "type": "string"
    },
    "questionSlug":{
      "type": "string",
      "required": true
    },
    "question": {
      "type": "string",
      "required": true
    },
    "negativeVotes": {
      "type": "number",
      "default": 0
    },
    "positiveVotes": {
      "type": "number",
      "default": 0
    }
  },
  "validations": [],
  "relations": {
    "answers": {
      "type": "hasMany",
      "model": "answer",
      "foreignKey": "questionId"
    }
  },
  "acls": [],
  "methods": {}
}
Now let’s see how does our API look using the LoopBack explorer so I can show all the awesome stuff you can do through the explorer.
Start the loopback server by running node . and access the explorer at http://localhost:3000/explorer
Below you can see all the basic routes created by LoopBack without writing any code for our Question model.
Now we will try to use this explorer to make a CREATE a new Question.
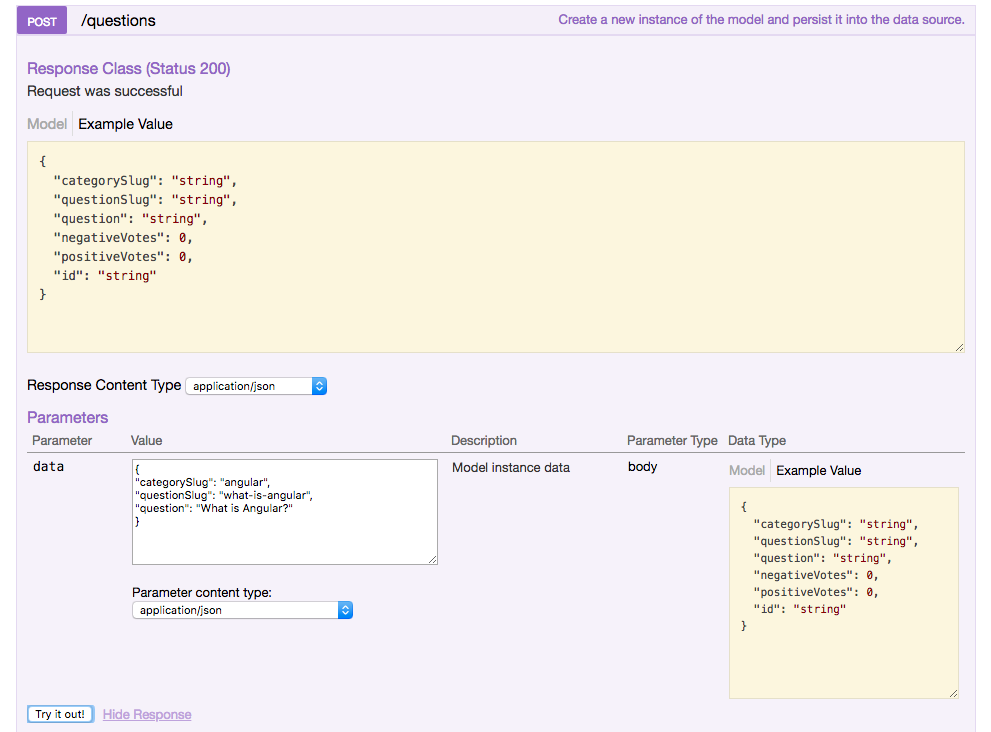
After typing the list of required parameters, press “Try it out!” and see what happens:
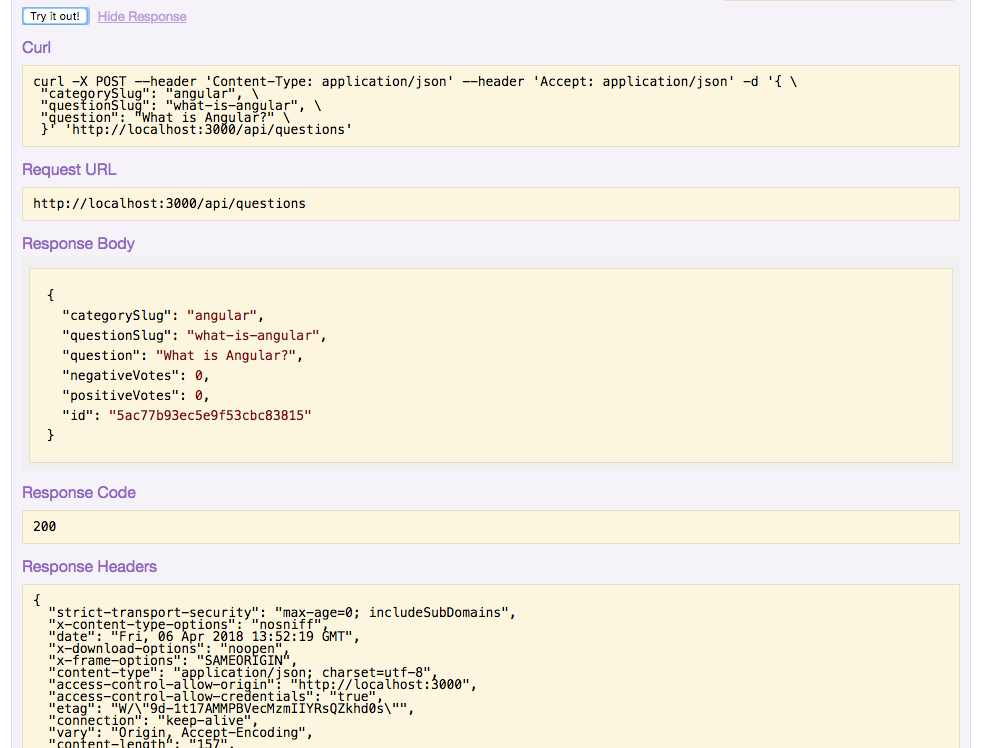
Voilà! We have created a new question. Super easy, right?
Loopback backend API Relations between models
It may seem that models are complicated because they are often connected or related. But individual models are easy to work with. When building a real-world application with multiple models, you just have to define relations between them to work comfortably.
With connected models, LoopBack excels as a set of APIs to interact with each model instances and query and filters the information based on the client’s needs.
You can define the following relations between models:
- BelongsTo relations
- HasOne relations
- HasMany relations
- HasManyThrough relations
- HasAndBelongsToMany relations
- Polymorphic relations
- Embedded relations (embedsOne and embedsMany)
In our example we have a RESTful API with two models: Questions and Answers. Now we want to add a relation between these two models. This relation will be many-to-one. A question can have many answers but an answer can belong to just 1 one question.
Let’s define the models relations in the model definition JSON file as we illustrate below:
In our model/question.json file we define the hasMany relation like this:
"relations": {
	"answers": {
		"type": "hasMany",
    	"model": "answer",
    	"foreignKey": "questionId"
	}
}
In our model/answer.json file we define the belongsTo relation like this:
"relations": {
	"question": {
		"type": "belongsTo",
    	"model": "question",
    	"foreignKey": "questionId"
	}
}
Using the belongsTo means that every Answer will belong to just one Question.
If you need more information about loopback model relations, please refer to the official LoopBack documentation about model relations.
Controlling data access to your backend API with Loopback ACL
LoopBack applications access data through models, so controlling this means putting restrictions on models; that is, specifying who or what can read and write the data or execute methods on this models. LoopBack access controls are determined by Access Control Lists or ACLs.
In order to properly implement access control in your application, you should follow these steps:
- Implement authentication: add code to create (register) new users, log in users (get and use authentication tokens), and log out users.
- Specify user roles. Define the user roles that your application requires. You may want to create roles for anonymous users, authenticated users and administrators.
- Define access for each role and model method. For example, you might enable anonymous users to read a list of banks, but not allow them to do anything else. LoopBack models have a set of built-in methods, and each method maps to either the READ or WRITE access type.
-
Set-up access control for users. You could either do it dynamically or statically:
- Add code to register dynamic role resolvers that at runtime resolve whether a user, according to a preconfigured set of conditions, has a given role. You can find more information about this here Dynamic roles.
- Statically map users with any role previously created using the Role model.
For further information about ACLs, please take a look at the loopback-example-access-control example.
Angular REST API backend integration using the Loopback SDK
At this point we have learned enough LoopBack to build our API. We achieved a complete set of functionalities for our backend and now it’s time to start thinking on connecting our backend API to our Angular front-end application.
Fortunately, LoopBack has us covered with the mighty LoopBack SDK! Whether you are building your frontend for the web (Angular) or a native app (Android or iOS), LoopBack has a tool for auto-generating client SDK’s that enables you to easily enable Angular to interact with the backend you’ve made with LoopBack.
We are going to use the loopback-sdk-builder module to create an Angular client SDK to access and interact from Angular with our LoopBack server application.
This client SDK is dynamic, that means it automatically includes all the models and methods within LoopBack that you've defined on your server so you don't have to manually write any static code in your Angular frontend.
Maybe you thought that after creating all the API endpoints in LoopBack we were going to code all the http calls and services in our Angular app by hand. No way!, the LoopBack SDK Builder will explore our LoopBack application and will automatically build everything we need to connect our backend with our Angular application. From Interfaces and Models to API Services, all code Angular friendly.
To install the loopback sdk builder, run the following command inside your project
npm install --save @mean-expert/loopback-sdk-builder
After installing run the following command to generate the sdk:
./node_modules/.bin/lb-sdk server/server.js /path/to/client/sdk
Note: The sdk will be created inside /path/to/client/sdk folder.
You can further configure the sdk builder according to your environment. Please refer to the sdk builder official documentation for the full list of configuration options.
Now we are ready to move on and learn how to use the Angular SDK we just created in our Angular frontend app.
Angular backend integration
Jumping in with Angular, building the frontend
If you have been following this tutorial, you may know that the Angular app was created in our previous tutorial: Learn Angular from scratch step by step. So, now we will connect the Loopback API with this Angular app.
In order to resume working on our app, let’s start by cloning from github the project we started in the first tutorial (if you already did it, just skip this step):
git clone https://github.com/AngularTemplates/learn-angular-from-scratch-step-by-step
cd learn-angular-from-scratch-step-by-step
Once we are located in the project folder, proceed to install the dependencies, run this command:
npm install
The structure of our Angular app includes the following folders and files:
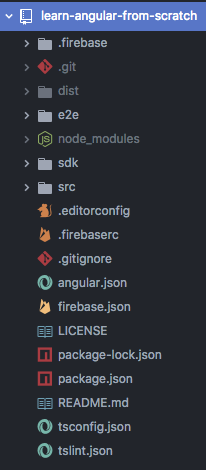
Note that we manually copied the sdk folder that Loopback generated for us in the API project and put it here.
Inside the SDK there are a bunch of Angular Services and Models that were auto-generated by the LoopBack SDK builder. Now we need to understand how to use them in our Angular app.
Fetching data from the NodeJs backend API in Angular
Let’s focus on displaying the data from the LoopBack backend API.
As we mentioned before, inside the /sdk folder there are a bunch of Angular services that communicate with the API endpoints.
Let’s have a quick look at the structure:
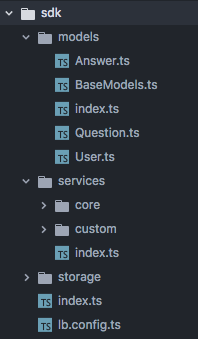
These services and models are super easy to use. For example let’s see how to query the questions in our Angular app.
We defined our QuestionsService in src/app/services/questions.service.ts and imported the QuestionApi (from the Loopback SDK) like this:
@Injectable()
export class QuestionsService{
 constructor(private questionApi: QuestionApi) {}
	...
}
Then to get all the questions we defined our getQuestions method like this:
getQuestions(){
	return this.questionApi.find<Question>()
 	.toPromise()
}
Super easy, right?
Now let’s see how we would do to query all the questions with the “answers” relation we defined in our API. It was a one to many relation, remember? One question can have many answers. To do this we will use a LoopBackFilter like this:
getQuestions(){
	let filter: LoopBackFilter = {
     "include":{
       "relation": "answers"
     }
   }
	return this.questionApi.find<Question>(filter)
 	.toPromise()
}
A LoopbackFilter can be any of the following:
export interface LoopBackFilter{
	fields?: any;
	include?: any;
	limit?: any;
	order?: any;
	skip?: any;
	offset?: any;
	where?: any;
}
For example if we want to get only the questions of a specific category we can do:
getQuestionsByCategory(category_slug){
	let filter: LoopBackFilter = {
     "include":{
       "relation": "answers"
     }
		 "where": {
        "categorySlug": category_slug
      }
   }
	return this.questionApi.find<Question>(filter)
 	.toPromise()
}
The create, update and delete operations are also super easy.
deleteQuestion(questionId){
	return this.questionApi.deleteById<Question>(questionId)
	.toPromise()
}
createQuestion(values){
	let data = new Question(); // this is the Question model also imported from the SDK
	data.question = values.question;
  	data.questionSlug = values.questionSlug;
  	data.categorySlug = values.categorySlug;

	return this.questionApi.create<Question>(data)
	.toPromise()
}
updateQuestion(question){
	return this.questionApi.updateAttributes<Question>(question.id, question)
	.toPromise()
}
As you can see, you can create, delete, update and retrieve data from the API using these services.
Check our AnswersService to see how to handle the answers in our Angular example app.
Adding details to the UI with Angular Material design components
Now that we have the ability to create new questions and answers, let’s add Angular material design UI components to handle this task.
The Angular material2 library (@angular/material) has tons of components ready to use in your Angular project, for the full list of UI components please refer to the Angular Material official documentation.
And here’s how it look like the polished UI:
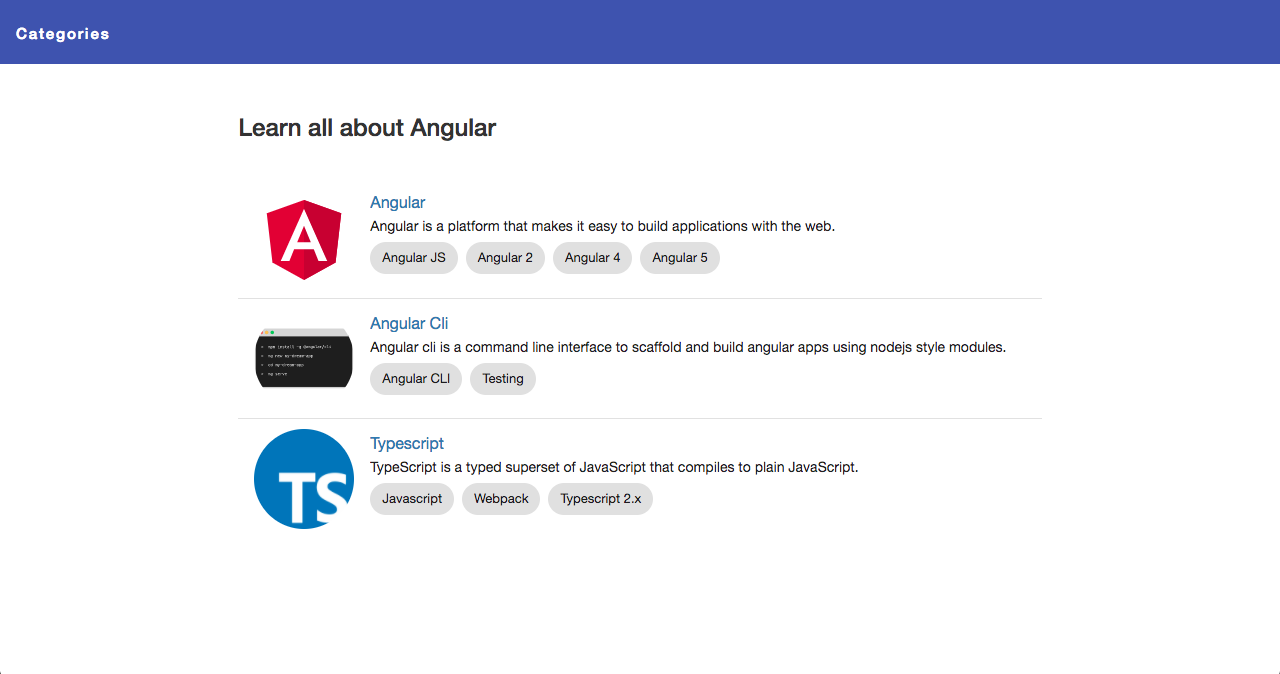
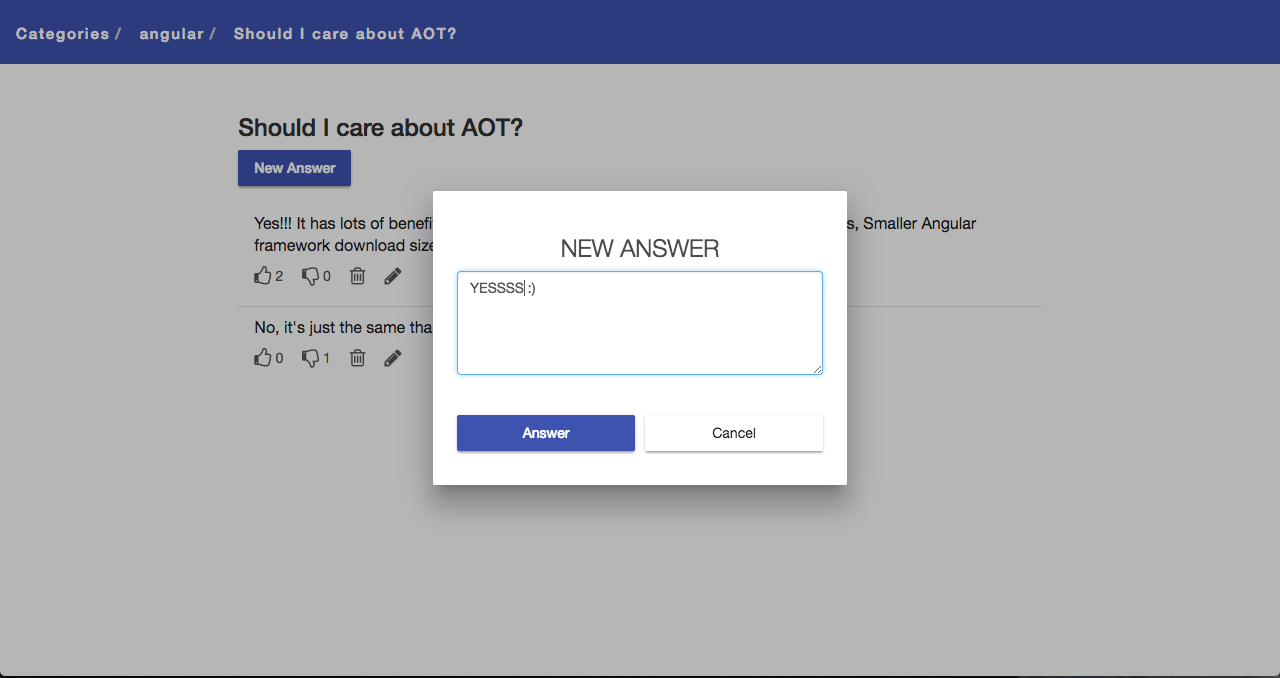
Congratulations, we have built a truly full stack javascript application using Angular with NodeJS.
Run and Test the MEAN Stack Angular CRUD Application
Wrap up
It's time to test the application we just built using MEAN stack, LoopBack and Angular.
The project consist of two applications, the frontend and the backend.
The backend is served using node on port 3000 (http://localhost:3000) and the frontend (while in development mode) is served using the AngularCLI on port 4200 (http://localhost:4200).
In our main.ts file from our Angular project, we have set the API url. We can do it using the setBaseURL from LoopBackConfig:
import { LoopBackConfig } from '../sdk';

LoopBackConfig.setBaseURL(http://localhost:3000);
Our full stack project is complete, no doubt we can do a lot of improvements on it. If you have ideas or suggestions on what to add next to this project, please share your feedback on the comments section.
This isn’t the end folks, in our next post we will learn how to deploy this project to a production server. Stay tuned and subscribe to our newsletter!
Angular MEAN stack tutorial the complete guide
Final words...
Amazing! That feeling that you get after building a complete app from scratch. It feels good doesn’t it?
Congratulations if you followed our angular tutorial to the very end and built the angular full stack app successfully.
If you didn’t follow step by step you can get the source code of the entire app clicking the GET THE CODE button from above and work with it.
I know, this tutorial was pretty long, and I didn’t go into full detail of all the topics. But you can always leave your doubts in the comment section below.
I will encourage you to take this project and make it fit your needs. The point of this angular tutorial is to have a foundation for starting applications so that we aren't reinventing the wheel every time we start a new project.
We've put this tutorial together as a starter kit at this Github repo. We'll add features and updates to it on request. Surely it will be a good base for any sort of Single Page MEAN Stack Application.
In the following parts of these tutorial series, we will explore MEAN stack hosting alternatives. You will learn how to deploy the project to a production server. We'll do it at minimal cost to the developer. There will be no reason why you shouldn’t be able to get your apps launched to production!
If you are ready to build a performant and complete web app with Angular, I suggest you to consider using this Angular Admin Template. It's the most complete and advanced Angular Template with lots of components and performance improvements. It includes features such as Angular Universal, AOT (ahead of time compilation), Material Design, Lazy Loading Routes and lots of useful and beautiful components.
Check our
YouTube Channel

TOPICS
TABLE OF CONTENTS
-
Introduction
-
Why MEAN stack?
-
Best backend and database for Angular?
-
What does RESTful API really mean?
-
Let’s get started
-
Project specifications
-
REST API implementation
-
MEAN stack Project structure and beyond
-
Angular backend integration
-
Trying our angular application
Comments
Our aim is to help developers of different skill levels get the most out of Angular by saving their expensive time and providing great resources for them to learn faster and better.
