Learn Angular with free step by step angular tutorials
All you need to learn about Angular, the best tips and free code examples so you can get the most out of Angular.Angular Internationalization - Angular i18n Multi Language

Internationalize your angular app
In this angular localization tutorial we will learn how internationalize an Angular application. This process is also known as i18n. Internationalizing our website means that it will be available in different languages. In this guide we will learn to create a multi language angular website. The good news is that the new Angular CLI can help us achieving this task.
In this angular translate tutorial we will explain, step by step, how to create an angular website and extract the text from the templates into a xml file. Then, we will show you how to edit the angular.json file to add all the necessary configurations to build our app in different languages. And finally, we will explain how to serve your website in multiple languages changing the base url, so for example, for a spanish version it will look like: https://yourwebsite.com/es and for english https://yourwebsite.com/en.
If you already know AngularTemplates you will know that we love creating great tutorials to help angular developers get the most out of this technology. That’s why we strive to create the best angular templates and angular tutorials with practical and free examples.
What is Internationalization?
Internationalization is the process of designing your app so that it can support various languages. It is also known as i18n.
What is Localization?
Localization is the process of translating your app into different languages. Before you can localize your app, you need to internationalize it.
Why is Internationalization so important?
Nowadays, with so many websites to choose from, making applications available and user-friendly to a worldwide audience is super important. It’s a step forward in the name of user experience.
Angular i18n demo
The website we created for this angular internationalization tutorial is published here and you can download all the source code by clicking the GET THE CODE button from above.
Looking for an angular i18n template?
At AngularTemplates we offer premium ready-made angular applications that to can use to jump start in your next angular project. Use them as a base for your next angular app or use them to learn angular best practices and how to create a production ready robust and performant angular app.
If you are looking for a template with internationalization, we will be adding this feature soon to both Admin Template and Site template.
Creating a multi language angular app
Because we love server side rendering (ssr) and because we need a simple server to serve our website in multiple languages depending on the url is that we used the universal starter repo as a base for this project.
When we started digging into internationalization in angular we found this story about using the angular CLI to extract the texts to translate from your templates and then building and serving the app in one specific language. It’s a very good story, however, it was not complete for the solution we want to achieve. We want to create a multi language angular website, this means that the user should be able to select his desired language.

So, let’s start with the internationalization process!
First of all we need to setup our angular application to use i18n. You can check the angular i18n documentation as a reference, however, we will cover here all the required steps.
Angular i18n Template translations
The i18n template translation process has four steps and in this angular tutorial we will cover them all:
- Mark static text messages in your component templates for translation.
- An Angular i18n tool extracts the marked text into a translation source file. (The Angular CLI will do this for us)
- A translator (or you) edits that file, translating the extracted text into the target language.
- The Angular compiler imports the completed translation files, replaces the original messages with the translated text, and generates a new version of the app in the target language.
Step 1: Mark text with the i18n attribute
There is an Angular attribute to mark translatable content and it is i18n. You have to place it on every element tag whose fixed text you want to be translated.
Let’s take as an example the following code from or templates.component.html file:
<h1 i18n="@@templatesTitle">
	Templates
</h1>
As you can see we added the i18n attribute to our h1 tag. Also, we added a custom unique identifier "@@templatesTitle" for this h1. When you specify a custom id, the extractor tool and compiler (we will see how to use it in Step 2) will generate a translation unit with that custom id like the following:
<trans-unit id="templatesTitle" datatype="html">
Custom Ids are useful because when translating the texts (in our xlf files) we will know where the text belongs (in this case, it’s the title of the Templates page).
There are other types of identifications or descriptions you can use for your i18n attributes.
To sum up, in step 1 you have to identify all the static texts along your app that need to be translated and add them a i18n attribute.
Step 2: Create a translation source file
Once we marked all the texts to be translated, we are able to generate the translation source file using the Angular CLI. To do this we run the following command in a terminal window at the root of our app project:
ng xi18n
By default, the tool generates a translation file named messages.xlf , if you want to change the format you can use the flag --i18n-format.
This file has a list of trans-unit (translation unit). All the texts that need to be translated will be within the source tag. Let’s see how the messages.xlf looks like:
<?xml version="1.0" encoding="UTF-8" ?>
<xliff version="1.2" xmlns="urn:oasis:names:tc:xliff:document:1.2">
	<file source-language="en" datatype="plaintext" original="ng2.template">
		<body>
			<trans-unit id="toolbar-title" datatype="html">
				<source>My Application</source>
				<context-group purpose="location">
					<context context-type="sourcefile">app/app.component.html</context>
					<context context-type="linenumber">6</context>
				</context-group>
			</trans-unit>
			<trans-unit id="tutorial-button" datatype="html">
				<source>Tutorials</source>
				<context-group purpose="location">
					<context context-type="sourcefile">app/app.component.html</context>
					<context context-type="linenumber">18</context>
				</context-group>
			</trans-unit>
			//more translation units
		</body>
	</file>
</xliff>
Note: Every time a change is made to the html, either adding or modifying a text, this file must be generated again.
Step 3: Translate the extracted text into the target language.
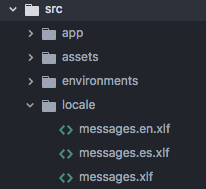
In this angular internationalization example app we created a locale folder in the root of the src folder as you can see in the following image.

Then, we moved the messages.xlf file generated in the previous step to this folder.
Now, we have to make one copy of messages.xlf for each language that we want our website to be translated to and add the language locale to the end of the file name. For each translation source file, there must be at least one language translation file for the resulting translation.
In our example we have the following xlf files:
messages.en: for english translationsmessages.es: for spanish translationsmessages: the base file which was generated in Step 2 and defines all the messages to be translated.
So, now we are ready to start actually translating the texts from our angular website.
In a large translation project, you would send the xlf files to a specific translator who would enter the translations using an XLIFF file editor. Because this angular i18n project is simple and it’s a learning tutorial we will do the translations ourselves using google translate.
So, let’s open our src/locale/messages.es.xlf file and see how to translate the texts.
As we mentioned in step 2, the translation files have a list of <trans-unit> and inside them there is a tag <source> with the text that we need to translate.
<trans-unit id="toolbar-title" datatype="html">
  <source>My Application</source>
  <context-group purpose="location">
    <context context-type="sourcefile">app/app.component.html</context>
    <context context-type="linenumber">6</context>
  </context-group>
</trans-unit>
Duplicate the target, and then replace its content with the Spanish translation.
<trans-unit id="toolbar-title" datatype="html">
  <source>My Application</source>
  <target>Mi Aplicación</target>
  <context-group purpose="location">
    <context context-type="sourcefile">app/app.component.html</context>
    <context context-type="linenumber">6</context>
  </context-group>
</trans-unit>
You have to translate all the trans-unit nodes in the same way. I know it may sound too complicated but it’s something you will do just once, so don’t panic!
For examples about translating plural and select expressions visit this link.
Step 4: Use the completed translation file into your angular application
To merge the translated text into the component templates we need to compile the app with the completed translation file. In order to do this we need to provide the Angular compiler with the following translation-specific pieces of information: the path to the translation file, the translation file format and the locale of the file, es or en for instance.
We will compile this angular multilingual website example with AOT because we want to show you how to create a production ready multi language angular application. The AOT (Ahead-of-Time) compiler is part of a build process that produces a small, fast, ready-to-run application package.
When internationalization is done with the AOT compiler, we must pre-build a separate application package for each language and serve the appropriate package based on either server-side language detection or url parameters. In this i18n tutorial we will serve the appropriate package based on url parameters, we will see this in a few minutes.
So, we now need to tell the AOT compiler how to use our translation configuration and we will do this in the angular.json file.
We add into the angular.json file the production-es and production-en build configurations and also the serve configurations which will run the build.
You need to create a build configuration for each language you want to localize your angular app.
"build": {
	...
	"configurations": {
		...
		"production-es": {
			"optimization": true,
			"outputHashing": "all",
			"outputPath": "dist/browser/es/",
			"sourceMap": false,
			"extractCss": true,
			"namedChunks": false,
			"aot": true,
			"extractLicenses": true,
			"vendorChunk": false,
			"buildOptimizer": true,
			"fileReplacements": [
			  {
			    "replace": "src/environments/environment.ts",
			    "with": "src/environments/environment.prod.ts"
			  }
			],
			"baseHref": "/es/",
			"i18nFile": "src/locale/messages.es.xlf",
			"i18nFormat": "xlf",
			"i18nLocale": "es",
			"i18nMissingTranslation": "error"
		},
		"production-en": {
			"optimization": true,
			"outputHashing": "all",
			"outputPath": "dist/browser/en/",
			"sourceMap": false,
			"extractCss": true,
			"namedChunks": false,
			"aot": true,
			"extractLicenses": true,
			"vendorChunk": false,
			"buildOptimizer": true,
			"fileReplacements": [
			  {
			    "replace": "src/environments/environment.ts",
			    "with": "src/environments/environment.prod.ts"
			  }
			],
			"baseHref": "/en/",
			"i18nFile": "src/locale/messages.en.xlf",
			"i18nFormat": "xlf",
			"i18nLocale": "en",
			"i18nMissingTranslation": "error"
		}
	}
},
"serve": {
	...
	"configurations": {
		...
		"es": {
			"browserTarget": "i18n-demo:build:production-es"
		},
		"en": {
			"browserTarget": "i18n-demo:build:production-en"
		}
	}
}
Note that you need to set the following configurations:
"outputPath": "dist/browser/es/": the output folder for your Spanish project"baseHref": "/es/": the base url param for your spanish version of your app"i18nFile": "src/locale/messages.es.xlf": the path to the translation file."i18nFormat": "xlf": the format of the translation file."i18nLocale": "es": the locale id
Now, to run your angular application in one of the configured languages you can run:
ng serve --configuration=es
In this section we learned how to internationalize and localize our angular app into different languages and also how to run it for a specific language. The limitation we have now, is that we can’t change the language once the app is built. In order to serve a multi language app we need a Server.
Creating an Angular Server for i18n multi language
In a production environment, we would like our angular app to be accessible in different subdirectories, depending on the language; for example the spanish version would be accessible at https://yourwebsite.com/es/ and the english one at https://yourwebsite.com/en/. We also would like to be redirected from the base url https://yourwebsite.com to the url of our preferred language.
To achieve this, in the previous section we changed the base href to es or en depending on the target language. We did this in the angular.json file.
As we mentioned at the beginning of this i18n angular tutorial, we will use a simple Express server. For this project, we used as a base the universal starter project. That project already has a server.ts file, but we will need to add some lines of code to achieve the multi language capacity we want. Specifically, we will change this method:
app.get('*', (req, res) => {
  res.render('index', { req });
});
So, as I was saying, in our express server we will add some logic before rendering the requested page to check if the requested url has a correct format with the style 'https://yourwebsite.com/any-locale/' and if it matches any of the locales we support in our angular app (es or en). If not, we will render the default locale: english.
The final code will look like this:
app.get('*', (req, res) => {

	//this is for i18n
  const supportedLocales = ['en', 'es'];
  const defaultLocale = 'en';
  const matches = req.url.match(/^\/([a-z]{2}(?:-[A-Z]{2})?)\//);
  //check if the requested url has a correct format '/locale' and matches any of the supportedLocales
  const locale = (matches && supportedLocales.indexOf(matches[1]) !== -1) ? matches[1] : defaultLocale;

  res.render("${locale}/index", {req});
});
One important thing to explain from the code above is the:
res.render("${locale}/index", { req });
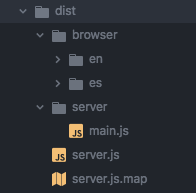
Note that we added ${locale}, and this is because depending on the requested locale, we will serve the code from a different folder. After compiled, your dist folder will look like this:

The angular compiler will create one folder for each supported locale with all the app translated to that locale. So, inside the en and es folders there is an index.html file which will be rendered in each case.
Scripts to compile and run our i18n angular app
At this step, our angular app is internationalized, localized and has an express server capable of serving the correct code depending on the locale.
Finally, to finish this angular localization example I will show you the scripts we added in the package.json to build and serve the app:
"scripts": {
	 "ng": "ng",
	"start": "ng serve",
	"build": "ng build",
	"lint": "ng lint i18n-demo",
	"build:client-and-server-bundles-i18n": "ng run i18n-demo:build:production-es && ng run i18n-demo:build:production-en && ng run i18n-demo:server:production",
	"build:client-and-server-bundles": "ng build --prod && ng run i18n-demo:server:production",
	"build:ssr": "npm run build:client-and-server-bundles && npm run compile:server",
	"build:i18n-ssr": "npm run build:client-and-server-bundles-i18n && npm run compile:server",
	"compile:server": "tsc -p server.tsconfig.json",
	"serve:ssr": "node dist/server"
}
Note that we use the build configurations we added in angular.json before.
To build your angular app for a specific language run:
ng serve --configuration=es
or
ng serve --configuration=en
To build your app for Production with i18n multi language run:
npm run build:i18n-ssr && npm run serve:ssr
It compiles your application and spins up a Node Express to serve your Universal application.
Keep learning Angular
I hope this angularjs i18n tutorial helped you creating a multi language Angular application. Remember you can download all the source code by clicking the "GET THE CODE" button from above and also try the demo in https://i18n-demo-angular-templates.herokuapp.com/
Now that you’ve experienced more about angular localization, you can continue with:
- Firebase Authentication with Angular
- Angular Forms and Validations
- Learn how to build a MEAN stack application in this Angular tutorial
If you are looking for a template with internationalization, we will be adding this feature soon to both Admin Template and Site template.
If you want to build a complex and robust web app with Angular you should check Angular Site Template which is a super complete application to build your next angular project. It includes Bootstrap 4, Angular Universal (Server Side Rendering), SEO, Lazy Loading and a detailed documentation on how to get started building Angular apps. Tons of use cases implemented the Angular way such as authentication flows, product listing, filtering, forms, routing guards and more.

Check our
YouTube Channel

TOPICS
TABLE OF CONTENTS
-
Internationalize your angular app
-
Creating a multi language angular app
-
Creating an Angular Server for i18n multi language
-
Scripts to compile and run our i18n angular app
-
Final Thoughts
Comments
Our aim is to help developers of different skill levels get the most out of Angular by saving their expensive time and providing great resources for them to learn faster and better.
